Wednesday, September 29, 2010

Chili Peppers: Crushed Red

Having years ago learned that the flavor of fresh-dried or fresh-ground spices is leagues better than the barely-there flavor of those little expensive cans of dust you find in the supermarket, I don't buy any herbs or spices dried or ground unless I'm having a pantry emergency.

Crushed red pepper is no exception.  While you will get heat from store-bought crushed red, you will not get the depth of flavor that comes from drying your own local peppers each autumn.  And have you SEEN the glorious selection of peppers at the Farmers' Markets?  Ask for the hottest ones, rinse and wipe dry, spread them out on an airy surface like a cooling rack, and go do something else for a few weeks.

If you get impatient, you can cut the stem top off and slice the peppers in half.  They will dry faster this way, but they won't look as scenic, and they'll take up more room.  I've found that if you make a wreath or swatch of the peppers, the air doesn't circulate as well and some of the peppers may mold.  If you find that any of the peppers you are drying turn black, discard them.

When peppers are dry (you can hear the seeds rattling when you shake the pepper), remove the stem tops and let the peppers dry again for a few days just to make sure they are really dry.  Now make your heat decision. Much of the heat in hot peppers is in the seeds.  If you want maximum heat, leave all the seeds in.  To tone things down a bit, discard some of the seeds.  But if you have read this far and like spicy food, you will scoff at that instruction.

Toss the dry peppers into a food processor and pulse until you get particles of a size that is pleasing to you.  Should you want smaller particles than the food processor will produce, grind a few tablespoons of the flakes at a time in a coffee grinder (that you reserve for grinding spices) 'til the sizes please you.

Store in a covered jar and use carefully.  It doesn't take long to make your soup or sauce inedibly hot; I usually start with 1/8 teaspoon of seeds to, say, your average eight-cup batch of soup.  The longer the peppers cook in anything, the hotter the dish will be.

Wednesday, September 22, 2010

Pure Eire, Again

It seems impossible for me to stop blathering about how incredibly delicious Pure Eire cream is. It makes amazing butter. And I served it, whipped, atop a plum tart. You simply cannot believe the sumptuous texture and deep, buttery flavor of this whipped cream! And two days later, the whipped cream left over hadn't even begun to separate.

I buy it at Richland or Kennewick Health Food Stores, in the dairy section. As of this writing, Wednesday is the usual fresh delivery day.

Let's face it, if you're going to have cream now and then, it might as well be ethereal, no?

Monday, September 20, 2010

Chilis Rellenos Americanos


I have always loved chilis rellenos. Authentic recipes call for dipping the whole cheese-stuffed poblano pepper into egg batter and deep frying it. The stem end is left on for a very rustic experience.

Over the years I reserved chilis rellenos for special occasions when eating out, and never made them at home. Then, about six years ago, I decided to come up with my own recipe, one that would satisfy but be less greasy. I've made it many times, always in the summer when the poblano peppers start appearing at the farmers' markets.

The dish is wonderfully warm, smoky, chile-y, eggy and satisfying. It would make a great breakfast casserole, but I usually serve it with cornbread and coleslaw for dinner.

Be warned that roasting peppers indoors WILL set off your smoke alarms. At the Richland Farmers' Market, there's a vendor who will roast your peppers over a gas flame while you wait. It doesn't take long, but you'll want to get right home and refrigerate the roasted peppers 'til you're ready to use them.
____________________________________________
CHILIS RELLENOS AMERICANOS

Smoky chipotle salsa is simply a can of chipotle peppers "en adobo" (sauce), which you puree and store in the fridge. This little jar of smoky heat will come in handy for a lot of dishes.

6 or 8 poblano peppers (you may see these incorrectly called "pasilla" peppers)
16 ounces or so grated jack, pepper jack, cheddar, or a mixture of cheeses you like (smoked gouda gives the finished dish a more smoky flavor)

8 eggs
1/2 cup milk
1/4 teaspoon salt
1/8 teaspoon crushed red pepper

Sliced green onions if you have them
Smoky chipotle salsa, about 1 tablespoon

Wash the peppers and cut the stems off. Reach down into the center and remove the seeds. If using a pepper roaster over a gas flame, turn on your exhaust fan. Arrange about three peppers at a time over the flame so they get maximum exposure. As skins start to pop and char, turn to expose all sides and, when peppers are charred evenly, toss them into a bowl lined with a paper towel, and cover them immediately. Roast remaining peppers and let them cool gradually in the covered bowl for 15 to 20 minutes.

Alternatively, arrange peppers on oven rack and turn oven to 500 degrees. Turn on exhaust fan. Roast peppers 'til skins start to pop and char; turn if necessary. Continue with step calling for putting them in a paper-towel-lined bowl and covering them. You can also place them in a brown paper bag, rolling the top down closed.

Rub the peppers to remove the black char as much as possible. Lay them out on your work surface.

Beat eggs with milk, salt and crushed red pepper until very well blended.

Set aside some of the grated cheese to sprinkle on the top of the dish. Form remaining grated cheese into fists, as many as you have peppers. Gently open the peppers and put the cheese into the cavity. Arrange peppers in a casserole, and pour the egg mixture over. Scatter sliced green onions on top.

Bake casserole at 375 degrees for 15 minutes, then lower heat to 350 degrees and bake for 20 minutes, or until knife inserted into egg mixture comes out clean.

Drizzle smoky chipotle salsa over the top, then brush it around to coat top of casserole. Sprinkle reserved cheese atop, and serve.

Makes 6 to 8 servings, depending on how many peppers you used.

Sunday, September 19, 2010

Eggplant and Potato Gratin


A total departure from cheesy gratins, this dairy-free recipe is one of those serendipitous discoveries that I can't imagine not having found. I make it every year about this time when all the fresh vegetables in it start showing up at the farmers' markets. Everything in this dish except the olive oil, salt and pepper was locally grown.

This gratin truly illustrates the rich depth and mingling of flavors achievable with a simple preparation and ingredients that compliment each other. Be sure to use a really good olive oil.
_________________________________________
EGGPLANT AND POTATO GRATIN
From The Vegetarian Bistro by Marlena Spieler

If time is short or you are using potatoes that take longer to cook, like Yukon Golds, you can microwave the casserole for about 15 minutes to get it heated up, then put it in the oven to finish.

1 onion, thinly sliced
1 red bell pepper, seeded, deribbed and cut into strips
4 tablespoons olive oil, plus more as needed

1 cup drained, diced tomatoes
3 garlic cloves, minced
Several large pinches of dried thyme (be generous here)

1 eggplant, stem end trimmed, sliced lengthwise 1/8- to 1/4-inch thick
2-1/2 pounds potatoes, peeled and thinly sliced

Salt and freshly ground pepper

Using 2 tablespoons of the olive oil, saute the onion and red pepper in a medium skillet 'til softened, about 5 minutes. Add the tomatoes, two thirds of the garlic, salt to taste, and the thyme. Cook briefly and set aside.

Brush or rub eggplant slices with olive oil on both sides, and cook them on a griddle until lightly browned on both sides. Alternatively, broil the slices under the broiler. I suspect you could get away with not pre-grilling the eggplant slices, but I haven't tried it.

Preheat oven to 375 degrees. Lightly oil a 3- or 4-quart casserole dish. Place one third of the potatoes in a layer on the bottom, and sprinkle them with salt and pepper. Layer on half the eggplant, another third of the potatoes, and the remaining eggplant.

Spread the tomato mixture over the eggplant, then toss the remaining potatoes in a bowl with the remaining garlic and olive oil, and spread them over the eggplant.

Sprinkle the final potato layer with salt and pepper, and drizzle with a little olive oil.

Bake for 1 hour or until the top is golden and the potatoes are cooked through. Cover with foil if top gets too brown before potatoes are done. Test by inserting a paring knife down through the center of the gratin; it should meet little resistance. Serve hot or at room temperature.

Makes 4 to 6 servings

Thursday, September 16, 2010

Gyros!

Yes! You can make delicious gyros meat that goes wonderfully with the tomatoes, cucumbers and onions of the season. I had seen this recipe, and the tzatziki recipe that goes with it, some time ago, and finally decided to try it.

Local lamb and beef are, happily, quite available at our farmers' markets. You can also order from Thundering Hooves in Walla Walla, and they'll bring the order to a drop point in the Tri-Cities.

Honestly, this gyros meat is actually fun to make, is wonderfully delicious, and while it's baking will make your kitchen smell like a Greek restaurant!
__________________________________________
GYROS
Gyros and tzatziki recipes adapted from Velveeta Ain't Food

1 pound ground lamb
1 pound ground beef
2-1/2 teaspoons kosher (coarse) salt
1-1/2 teaspoons dried oregano

1 large yellow onion
2 large cloves garlic
4 slices bacon

Combine lamb, beef, salt and oregano with your hands. Wrap or cover and chill for at least 2 hours. This is important!

Line a small broiler tray with foil, poking holes in the foil so the fat will have a place to drain.

Preheat oven to 325 degrees. In a food processor, pulse the onion, garlic and bacon until pureed. Add the lamb/beef mixture and puree, scraping down sides as needed, until you have a smooth paste. Yes, it is not going to be attractive!

Gather meat into a rough loaf shape with you hands and place it on the foil-lined broiler tray. Shape it into a loaf that is about 2 inches thick; this will result in a loaf length of about 9 inches and width of 5 inches or so.

Place meat on middle rack of preheated oven and bake for about 1 hour or until it has an internal temperature of 155 degrees. Let loaf cool. I refrigerated mine and sliced it after it had chilled; this probably made it easier to slice.

Cut chilled loaf into 1/4-inch slices. Broil slices about six inches from broiler for about 4 minutes per side, or until meat is becoming crispy and browned.

Serve with tzatziki (below), and diced, fresh tomatoes, onion and cucumber. If you'd like a traditional gyros sandwich, you can make a thick flatbread (not pita bread) such as naan, and enfold your gyros meat and condiments in a bready enclosure. I served tabouli salad and decided not to use bread, and we didn't miss it.

Makes 28 1/4-inch slices, about six servings

TZATZIKI

3/4 cup plain low-fat yogurt
2 tablespoons mayonnaise
1 medium clove garlic, pressed or finely chopped
2 tablespoons lemon juice
3 tablespoons cilantro, chopped (or mint)

Mix all ingredients and refrigerate until ready to serve.

Quinoa Tabouli

You've seen them. Bunches of green stuff that hang out of baskets and lie around in heaps at the farmers' markets. Parsley, mint, cilantro, green onions, and so forth. And the bagged greens, which the farmer has so considerately captured for you to take home. But what to do with them!

Fret no more. Boldly wash and chop and mix and enjoy!
___________________________________________
QUINOA TABOULI
Adapted from Moosewood Cookbook

I had been wondering if quinoa could be substituted for bulgur, and yay! It can! Just make sure you watch carefully near the end of cooking so you can keep it fluffy, with grains separate, and not soggy and in clumps.

2 cups quinoa
5 cups water
1 teaspoon salt

1/4 cup fresh lemon juice
1/4 cup olive oil
1 large garlic clove, crushed or very finely chopped
1/2 teaspoon salt
freshly-ground black pepper

1 bunch parsley, washed, big stem ends removed, and spun dry
1 bunch mint, washed, leaves removed, and spun dry

1 bag of arugula, washed, thick stems removed, spun dry and sliced

1 small sweet onion, minced, or a bunch of green onions, with some of green parts, sliced

2 medium tomatoes, diced
1 large or 2 small cucumbers, diced

Rinse the quinoa 'til water is clear. Place in pot with water and salt. Bring to a boil, then lower heat and simmer, stirring now and then, 'til liquid is almost gone, about 15 minutes. Each time you stir, level out the quinoa in the pot afterward. Watch carefully for a few minutes, stirring occasionally, and when liquid has been reduced practically to nothing, remove quinoa from heat and stir to fluff. Set aside to cool.

Meanwhile, in a large bowl, whisk the lemon juice, olive oil, garlic, salt and pepper.

Blend cooled quinoa into the dressing in the large bowl. Stir in the parsley, mint, arugula, onion, tomatoes and cucumbers. You can also add bell peppers, zucchini, or other vegetables that you like. Serve the salad cold or at room temperature.

Hint: You can put the parsley and mint, and green onions if using, into a food processor and pulse 'til it's all a lovely green fluff.

Makes 8 generous servings

Raspberry Cream Scones

For some reason, I always thought a "cream scone" meant that you sliced it and put clotted cream on it. But no. You put the cream, a whole delectable cup of it, right into the dough. This makes a scone that puts anything you'll find at Starbucks, or almost anywhere else, into oblivion.

Be sure to use divine, local Pure Eire cream! Other fruits, fresh or dried, and nuts would work wonderfully here, I think. The key is to be quick and gentle when handling the dough.
_____________________________________________
RASPBERRY CREAM SCONES
Adapted from America's Test Kitchen Cookbook

2 cups all-purpose flour
1 tablespoon baking powder
3 tablespoons sugar
1/2 teaspoon salt

5 tablespoons chilled butter, cut into 1/2-inch cubes

1 cup heavy cream
1 cup raspberries

Adjust oven rack to middle position and heat oven to 425°F.

Place flour, baking powder and sugar in food processor. Pulse a few times to blend.

Scatter butter pieces evenly over dry ingredients. Cover and pulse (about 1 second per pulse) 10 times. Butter should be evenly chopped. Transfer mixture to large bowl.

Quickly stir in heavy cream using a rubber spatula, just until mixed and a dough begins to form, then gently and quickly fold in raspberries.

Gather dough and knead gently on a floured board for about 30 seconds. Flatten dough with you hands into an 8- or 9-inch round, then quickly cut the round into eight wedges, using a long, sharp knife or a pastry scraper. (You can cut rounds, as in biscuits, but the more you handle the dough the less tender it will become.)

Place scones on Silpat-lined or ungreased baking sheet and bake until tops are light brown, 12 to 15 minutes. Cool on wire rack for at least 10 minutes. Serve warm or at room temperature.

Makes 8 scones


Saturday, September 11, 2010

The Pluot Thickens ...


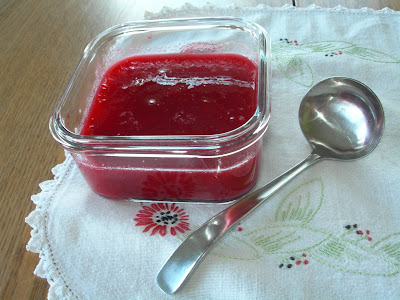
Buy lots of deep-red, organic Dapple Dandy pluots
from Gilmore Farms at Farmers' Market
Let pluots get really soft and juicy
Wash pluots
Pit and quarter pluots over a pan to catch juices
Simmer 'til soft
Add a splash of lemon juice
Cool

Freeze in containers for a remarkably flavorful, jewel-crimson sauce that in deep winter will awaken your memories of summer. Layer the pluot sauce with Coconut Quinoa Pudding. Serve it atop ginger ice cream. Brighten up your morning cereal with a slathering. Heat it up and add Dijon mustard, salt and pepper for a sumptuous sauce for pork.

Or just eat it. Sometimes the simplest thing really is the best.

Thursday, September 9, 2010

Rustic Tart of Local Plums

I admit to being somewhat beguiled by the word "rustic." I first saw it relating to edibles in a little bistro/pub in Twisp, Washington. "Rustic vegetable tart with cornmeal crust," the menu said.

The word was used to justify having just gathered the pastry up around the filling, rather than rolling it out and putting it in a pan. Well, I'm all for labor saving, and if calling something rustic gives me carte blanche to do so, I say yea!

In fact, the French have legitimized the whole process by calling these casual pies "galettes." And that's fine with me, too.
___________________________________________
RUSTIC TART OF LOCAL PLUMS

I can't remember where I found this recipe, but I've significantly altered it. The original called for sliced almonds to be stirred into the filling, Amaretto cookie crumbs (ridiculously expensive) to be scattered underneath the plums, and the pastry to be brushed with heavy cream and sprinkled with coarse brown sugar before baking. None of that, however, is necessary to produce a superb, memorable and delicious plum tart.

Pastry:
1-1/2 cups all-purpose flour
1 tablespoon sugar
1/2 teaspoon salt

7 tablespoons cold butter, cut into pieces
5 to 6 tablespoons cold water

Filling:
1/2 cup sugar (or less)
3 tablespoons all-purpose flour
1/4 teaspoon freshly ground nutmeg

2-1/2 pounds (about 8 large) not-too-ripe-or-juicy plums or pluots, pitted and cut into eighths
1 tablespoon lemon juice

Assembly:

1 egg, beaten

In food processor, combine flour, sugar and salt; pulse to mix. Add butter and pulse briefly just until coarse crumbs form. Add cold water and process in pulses until a loose ball of pastry forms. Add more water very gradually if necessary; the less you process the pastry, the flakier it will be. Gather pastry into a ball, flatten slightly, wrap in plastic, and refrigerate while you prepare the filling.

In large bowl, mix sugar, flour and nutmeg. Slice plums into a colander set over a plate. You don't want massively juicy plums for this recipe. Save the juicy ones to eat while standing over the kitchen sink!

Heat oven to 425 degrees F.

On a lightly floured board, roll out pastry to a 14-inch round. Gently fold pastry round into quarters and transfer to a baking sheet (with Silpat liner) and unfold the round. Brush the beaten egg in a circle in the center of the round, leaving about a 2-inch egg-free border.

Quickly stir plums into flour mixture, and add lemon juice. Pile plums quickly onto the center of the pastry, in the egged area (the egg seals the pastry and keeps the plum juices from softening the crust), and bring the sides of the pastry up around them.

Bake in middle of oven for 25 minutes, then check. If pastry is getting too brown, cover with aluminum foil. Bake another 15 to 20 minutes. Cool. Slice into 8 pieces and serve with creme fraiche, ice cream, or whipped cream.

Serves 8

Wednesday, September 8, 2010

Fresh Pear Sauce with White Wine and Cardamom


September has come upon us. The chill of night, the heaped cumulus clouds in the sharp blue sky of day ... and the abundance, nay, plethora, of fresh fruit lying around the kitchen. For example, the armful of pears given to me last week.

To a frugal cook, such questions as, "Can you make sauce out of pears like you can with apples?" are common. The answer to this one is, I am happy to say, most definitely yes.

I chose white wine over red to avoid the potential result of a nasty shade of pink or purple in the resulting sauce; as well, it seemed cardamom would go well with pears' more exotic taste, and indeed it does. But stealing the cinnamon from apples would do, too, if you have no cardamom.
___________________________________________
FRESH PEAR SAUCE WITH WHITE WINE AND CARDAMOM

This sauce is wonderfully fragrant and delicious; the pears' flavor mingles in a happily companionable way with the wine and cardamom. It's truly elegant enough to serve with a special meal such as roast pork, or alongside an autumnal dessert like fresh gingerbread.

About 10 fresh pears
A blub of white wine
1/2 teaspoon freshly ground cardamom seeds (I used a mortar and pestle)

Peel, core and quarter or dice the pears, and put them in a medium-sized pan or pot. Toss in the blub of white wine and the cardamom, and bring the whole thing to a simmer, cooking until the sauce reaches the texture you prefer--slightly chunky or more smooth. If you like, run a potato masher through it to even the texture.

Makes about 5 1-cup servings.