That's a hunk of pink banana squash there. Egad! Braising greens, salad greens, two dozen eggs (my add-on), Delicata and acorn squashes, onions, turnips, leeks, dill, and some dried white beans.
Even though I was a little tired the night I picked up this box, its contents clearly were not going to wait for me to feel like dealing with them. So onward I forged.
I washed the dill and put it to soak and revive. Topped the turnips and leeks, cleaned up the onions, seeded and peeled and chunked the banana squash. Realized I had some beets left from an earlier box, and so dinner began to take shape ... CSA Box Emergency Borscht.
A big chopping session ensued, and most of the onions and turnips and all of the dill and leeks went into a pot with a pound of Baron Farms pastured pork sausage, some cabbage, and some chicken broth. And you know what? By the time the soup was simmering nicely, I felt re-energized!
The cubed squash went into the fridge for another day, when I tossed it in coconut/sesame oil, coated it with Rogan Josh seasoning, and roasted it. Divine!
Sometimes the CSA boxes seem like a lot of work. But we enjoyed the soup for several days, and the roasted squash was delicious. Totally worth the effort!
Pages
▼
Monday, December 26, 2011
Thursday, December 22, 2011
Kale, Cranberry and Blood Orange Salad
Because I'm usually the only cook around our house, I think constantly about faster ways to get things done in the kitchen and still end up with tasty, attractive results.
I don't know why it took me so long to figure out that kale salad is way easier, and even tastier, made in the food processor instead of with laborious stacking and slicing. You can, of course, stack and slice for a different effect. This method produces a more relish-like salad that is, I think, optimally flavorful and easy to eat.
KALE, CRANBERRY AND BLOOD ORANGE SALAD
If you don't have Perol blood orange vinegar, just use orange juice instead of the apple juice, use your usual vinegar, and stir in a little grated orange peel just before serving. Or use other citrussy or fruity vinegar. The object is to get a fruity taste in there!
1/2 cup dried cranberries
1/2 cup apple juice
1 bunch Lacinato kale
1 small shallot
2 tablespoons Perel blood orange vinegar
1 tablespoon olive oil
1/4 teaspoon salt
1/2 cup coarsely chopped walnuts
In food processor, chop shallot finely.
In small saucepan, combine apple juice and cranberries, and heat gently to warm. Add chopped shallot, and remove pan from heat. Set aside.
Wash kale, spin dry, and remove thick stems. Place stemmed kale in food processor (in batches if too crowded) and chop coarsely.
Place chopped kale in medium bowl. To juice mixture in pan add vinegar, olive oil and salt. Stir, then pour dressing over kale and mix well.
Just before serving, stir in walnuts.
Makes 4 servings.
Monday, December 12, 2011
2011: Winter CSA Box 2
My mother-in-law called one day, and chatted with Mr. Eating the Scenery. She must have asked how I was doing, because Mr. ETS said, "Oh, she's having lots of fun with fruits and vegetables."
And so it is that we acquire, by virtue of that which engages us, a certain identity. So be it. I can think of worse things to be associated with!
The second Winter CSA box's largesse included salad greens, braising greens, spaghetti and acorn squash, broccoli, green cabbage, daikon radishes, onions, taters, and Brussels sprouts. And yes, I'm having fun with them.
Friday, December 9, 2011
A Turkey in Two Hours
The original article from the Tri-City Herald. |
Such a recipe is "A Turkey in 2 Hours" from a long-ago edition of the Tri-City Herald. The technique is from Chef Wil Masset, then owner and master chef of Birchfield Manor in Yakima. He is still there, though his son is now the chef and owner.
My turkey weighed 15 pounds, and was Organic Prairie brand from Fred Meyer. Blue Valley Meats offered local turkeys, but I didn't decide on the menu this year soon enough to order one from them. I sincerely miss my former turkey providers, Russ and Laurie Stasska, who moved to North Carolina. Happy holidays, you two!
A TURKEY IN TWO HOURS
from Chef Wil Masset, Birchfield Manor, Yakima
You will need:
- Turkey
- Sharp knives
- Paprika
- Salt and pepper
- Olive oil
- Carrots, Celery and Onion
Preheat oven to 400 degrees. Position rack low enough so the oven can accommodate the roaster and turkey. Remember the turkey will be on its side, and thus perhaps a bit higher than if it were lying flat.
Prepare your seasonings and oil in little bowls so you have them all ready for when you begin to massage the turkey. For my 15-pound turkey, I used 2 teaspoons each of salt and pepper, 1/2 cup olive oil, and 5 teaspoons paprika (2 sweet, 2 smoked, and 1 hot).
Cut off the turkey's crop skin at neck, and cut off wings at second joint. Remove giblets. I placed the neck in the roasting pan to use in stock.
Place the bird in a large roasting pan on a bed of chopped carrots, celery and onion.
Now, rub the turkey (and the wings) with a mixture of salt, pepper and paprika, inside and out. Then rub olive oil into the turkey.
Arrange the turkey on its side, propping it up securely with the wings. Placing the turkey on its side better uses the oven heat and speeds cooking, preserving the moisture in the meat.
Place the prepared turkey on its side. This is important. |
Re-stabilize the turkey (remember to place it on its side) with the wings. You can turn the wings, too.
Return turkey to oven and continue roasting for another half hour to an hour ... until juices run clear when meat is pierced at the thigh joint near the body. A thermometer placed there should read at least 160 degrees.
My 15-pound turkey, which was completely thawed, took 2-1/2 hours to roast.
If the breast meat is done but the leg/thigh joint needs more time, you can either cover the breast with foil, or slice off the breast meat, and roast the rest of the bird some more.
This method produces a juicy, flavorful turkey, and the carcass/bones make a splendid stock. I used the drippings to make a gravy using almond flour and arrowroot, from a recipe in this cookbook.
A 15-pound bird will easily serve 8 to 10 people.
Friday, November 25, 2011
2011: First Winter CSA Box
As a kid, I used to watch Monte Hall on "Let's Make a Deal." He would stand there bemusedly, patiently holding his microphone, while contestants literally would jump up and down, going seriously delirious just to have the opportunity to choose "one of the three doors where Carol is now standing!"
At the time, I was somewhat puzzled that people could behave so in public. But last Tuesday I definitely had the urge to do a little dance on the sidewalk when I picked up my first Winter CSA box. It's nice to know the simple things in life can still thrill: turnips, cabbage, beets, squashes, cranberries, tomatoes, braising greens, salad greens, and radishes. All insanely fresh.
Wednesday, November 23, 2011
Spanish Garlic Soup with Saffron and Cumin
It's gray and blustery outside. It's the day after Thanksgiving. Maybe it's a Sunday night. Whatever. You just don't feel like cooking! But you feel better if you have a real meal instead of a snack, however healthy the snack might be.
Dragging yourself to the fridge, you open it. Maybe there's some leftover turkey or other meat in there. You keep local eggs on hand, right? If you're a foodie, you'll have saffron and smoked paprika on hand, too, and broth in your pantry or freezer. If not, go stock up ... you know you're going to have one of these moments this winter!
Traditionally, this soup is topped with a hefty number of white-bread croutons. Trust me, diced avocado is way more satisfying.
SPANISH GARLIC SOUP WITH SAFFRON AND CUMIN
Sopa española del ajo con azafrán y comino
1 small onion, diced
6 cloves garlic, peeled and coarsely chopped
1 clove garlic, peeled and minced (reserve for egg frying)
1 teaspoon ground cumin seed
2 cups diced cooked meat, optional (turkey, chicken, pork, beef)
1 quart homemade chicken or turkey broth
1 teaspoon saffron threads*
1 teaspoon smoked paprika
1/8 to 1/4 teaspoon crushed red pepper
Salt and pepper to taste
1 tablespoon butter or ghee
2-4 eggs (depending on number of servings you are making)
1 avocado, diced
In medium-sized pot, heat butter or ghee over medium heat. Add onion and chopped garlic. Cook, stirring now and then, for about 5 minutes or until onion begins to soften.
Sprinkle cumin over onion mixture and cook briefly, stirring to slightly toast it. Mmmmm!
Add meat, broth, saffron, paprika and crushed red pepper. Cover and simmer 15 minutes or so.
Meanwhile, heat 1 tablespoon ghee or butter in small skillet. Add the minced garlic, then immediately fry the two eggs in the butter/garlic mixture, turning eggs once.
Taste soup; add salt and pepper to taste.
Ladle soup into bowls. Top each bowl with a fried egg and some diced avocado.
Makes enough soup for four small or two large servings.
Monday, November 21, 2011
Simple Roasted Sweet Potatoes and Yams
For some reason, I 'm always astonished when I discover a simple, easy way to cook something. We do tend to over-complexify sometimes, don't we?
Organic yams and sweet potatoes, looking very fresh and wholesome, have been appearing regularly at my local Yokes Fresh Market. I recommend preparing more than you'll need for one meal ... they reheat beautifully and can be sliced or diced and fried to make a lovely hash with leftover duck, turkey or pork.
When peeling yams, be sure to peel through the light-colored layer just underneath the skin, to the darker orange layer underneath.
SIMPLE ROASTED SWEET POTATOES AND YAMS
I recently learned that yams and sweet potatoes are "cured," which means allowed to dry a bit after harvesting. Because of that, yams and sweet potatoes should be stored in a cool, dry place, and not in the refrigerator. I've tested this new bit of knowledge, and it seems to be true!
You'll need:
Yams and sweet potatoes
Coconut oil (you could probably use butter or olive oil; I haven't tried it yet)
Salt and pepper
1) Preheat oven to 375 degrees.
2) Peel your yams and sweet potatoes and cut into roughly same-sized chunks. They'll cook more evenly that way.
3) Melt some coconut oil (I used 1/4 cup for 2 yams and 2 sweet potatoes) and pour it into a mixing bowl.
4) Add the yam and sweet potato chunks and toss to evenly coat.
5) Tip yams and sweet potatoes onto a baking sheet (I used the bottom of a broiler tray).
6) Sprinkle with salt and pepper, or herbs, spices and seasonings to taste.
7) Roast for 40 to 50 minutes, testing near the end of the roasting time to see if the thickest pieces are tender through.
Serve, or place in casserole and cover to keep warm until serving time.
Thursday, November 17, 2011
Grassfed Chuck Roast, with Leeks and Fennel, in the Slow Cooker
Remember Crockpots? Who doesn't have a Crockpot story to tell: "It tipped over in the car on the way to a potluck! The beans hadn't even begun to get soft after 12 hours of cooking!" My personal stories are more along the lines of special dinners being ruined because the slow-cooked entree was ... ah ... not so much cooked as poached in a sea of simmered sludge.
But no more. Crockpots (generically known as slow cookers) are back with a vengeance. After all, we're all busy. We still want, as we did in days of Crockpot yore, to return home on a blustery fall evening to the savory smells of a dinner that is ready to eat.
Creative cooks have worked hard to achieve this renaissance in slow cooking. Having been intrigued by a number of their cookbooks, I decided to jump into the fray with Liana Krissoff's Secrets of Slow Cooking, and Costco's offering of a sleek, modern, 7-quart Crockpot.
The ancient 4-quart Crockpot I received as a wedding present in 1978 still works fine, but I was interested in the larger capacity, and ... the new digital controls! Essentially the same as older models (high and low settings), but now the hours count down so you know just how much time has elapsed, and when the hours you set are reached, the unit switches to "keep warm" mode.
For this, my first slow cooking foray in a couple of decades, I decided to stick with a simple beef dish. I thawed a Thundering Hooves grassfed chuck roast (Blue Valley Meats bought the inventory when Thundering Hooves went out of business) and checked out a slew of recipes in books and online.
I drafted up a unique recipe of my own, but when I started to prepare it, I found that my carrots had frozen in the vegetable bin, and I had no onions but did have a fennel bulb. Hence, the recipe I intended became this recipe instead. And when, five hours into the cooking process, I discovered two large leeks lurking in the fridge, I sliced those up and tossed them in. The result was so amazing that I'll definitely re-create this re-created recipe next time.
SLOW COOKED CHUCK ROAST WITH LEEKS AND FENNEL
A splendid, satisfying winter dish. I served it with a deep green kale salad with dried cranberries and walnuts, and spaghetti squash. Winter dinners don't get much better than this.
One 4-1/2 pound grassfed chuck roast (or smaller roasts to total about 4 pounds)
3 tomatoes, diced, or a can of diced tomatoes
1 7-ounce jar or can tomato paste
3/4 cup red wine
1 head garlic, peeled and roughly chopped (about 10 cloves)
1 fennel bulb, diced
2 large leeks, sliced (or put them in at cooking midpoint*)
1/4 cup oregano
1/4 cup thyme
2 teaspoons salt
2 teaspoons freshly ground black pepper
2 teaspoons smoked paprika
1/4 teaspoon crushed red pepper
5 bay leaves
Cut roast into even pieces (I cut mine into three chunks) and place them in the slow cooker.
Mix all remaining ingredients in a medium bowl. Pour the red wine into the empty tomato paste jar, cap and shake to rinse all the last bits of tomato paste out. Pour the sauce mixture over the roast, cover and cook on low for 8-10 hours or high for 4-5 hours.
My roast (4-1/2 pounds) was tenderly, meltingly perfect, at 8 hours. I removed the meat to a casserole, then poured the sauce into a deep saucepan, where I used my immersion blender to turn it into the most amazingly delicious (and starch-free) gravy.
This recipe easily would serve 8 people.
*It's a myth that removing the slow cooker's cover during cooking releases epic amounts of heat. You could even leave the lid off and get great results. So, poke, prod and add to your heart's content!
Sunday, November 13, 2011
Tom Yum Goong
This incomparable Thai soup requires a trip to your local Asian market, but after that initial effort, it's quick to prepare.
Tom Yum Goong is a magical soup. It soothes. It warms. It invigorates. I have theories as to why this is so, but it's more satisfying just to enjoy the soup than to talk about it.
Thanks to Michele, the lemon grass is local! She gave me a lemongrass start which I am nurturing indoors this winter and will set out in Spring. Lime leaves, lemon grass and tamarind freeze quite well, so keep some on hand to make this soup when you need it most!
TOM YUM GOONG
There is room for you to alter this recipe to suit your tastes, but do be careful of the broth-to-seasonings ratio. I combined many recipes and adjusted until I found perfection.
1/2 cup lime juice
1/4 cup Thai fish sauce
2 tablespoons red Thai curry paste
6 cups Oriental or chicken stock
4 cloves crushed or chopped garlic
8 kaffir lime leaves
15 inches of lemon grass, cut into 3-inch lengths
8 slices galangal or ginger
1/4 cup tamarind paste (if it has seeds, soak paste in water and strain into soup)
2 cups regular coconut milk (not "lite")
2 cups mushrooms, quartered
2 cups cabbage, cut in 1-inch chunks
2 cups broccoli, separated into florets
12 ounces tail-on shrimp, thawed or fresh
2 medium tomatoes, cut in wedges
Green onion and cilantro to garnish
Combine lime juice, fish sauce and curry paste in small bowl.
Bring stock to boil. Add garlic, lime leaves, lemon grass, galangal or ginger, tamarind paste and coconut milk. Boil for 3 minutes.
Add mushrooms, cabbage and broccoli. Boil for another 3 to 5 minutes until vegetables begin to be tender.
Add shrimp and tomatoes. Cook just until shrimp turn pink.
Stir in fish sauce mixture. Serve in bowls. Top each bowl with green onion and cilantro. If you like, you can swirl in more curry paste before garnishing, to raise the spice-heat level in individual bowls.
Makes 6 large or 8 smaller servings.
Wednesday, November 9, 2011
A Visit to the Northwest Regional Food Hub
For a while now, you've been seeing that little notice in the upper right side of my blog recommending the Northwest Regional Food Hub's "Shop the Northwest" website for placing your order for local products, to be delivered to their store for you to pick up.
Today I actually visited the Northwest Regional Food Hub.
I get positively giddy when I think about how fortunate we are to have such a varied and vast lineup of truly exceptional food producers in our area. As a farmers' market junkie, I droop in spirit a tad when the markets end, then perk up when my bi-weekly Winter CSA deliveries start. Now I can get my local food fix in between deliveries.
The Northwest Regional Food Hub is located at 603 Goethals in Richland, and is part of a larger movement to provide improved customer access for small and mid-size producers of fresh food and other products. At last ... something in our crazy world that makes sense!
As you might guess, people like those who run the Food Hub have a definitive interest in health and clean eating. I had a great discussion with one of them today. She's been grain free for more than three years, and it seems there are actually (!) people interested in learning how to cook for the grain-free lifestyle. In a moment of crazy enthusiasm, I shared my blog link and said I'd help with that.
The Hub has tastings, classes, farm tours, celebrations, and other events. The best way to keep up with the goings-on at this bustling mecca of local goods is to drop them a note here and request their e-newsletter. You must do this to stay up to date; things are changing rapidly at the Hub.
For hours and events, check their facebook page (link at top right on my blog) and their website.
Today I actually visited the Northwest Regional Food Hub.
I get positively giddy when I think about how fortunate we are to have such a varied and vast lineup of truly exceptional food producers in our area. As a farmers' market junkie, I droop in spirit a tad when the markets end, then perk up when my bi-weekly Winter CSA deliveries start. Now I can get my local food fix in between deliveries.
A refrigerator case of Pure Eire ... pure dairy bliss! |
The Northwest Regional Food Hub is located at 603 Goethals in Richland, and is part of a larger movement to provide improved customer access for small and mid-size producers of fresh food and other products. At last ... something in our crazy world that makes sense!
As you might guess, people like those who run the Food Hub have a definitive interest in health and clean eating. I had a great discussion with one of them today. She's been grain free for more than three years, and it seems there are actually (!) people interested in learning how to cook for the grain-free lifestyle. In a moment of crazy enthusiasm, I shared my blog link and said I'd help with that.
Local onions and pumpkins. |
The Hub has tastings, classes, farm tours, celebrations, and other events. The best way to keep up with the goings-on at this bustling mecca of local goods is to drop them a note here and request their e-newsletter. You must do this to stay up to date; things are changing rapidly at the Hub.
For hours and events, check their facebook page (link at top right on my blog) and their website.
Moxie Organix skin care products: "Courageous skincare with a heart." |
Friday, November 4, 2011
Brussels Sprout Salad from Mixt
A couple of weeks ago, we found ourselves in Bend, Oregon. At Ginger's Kitchen Shop, I was immediately drawn to their small but amazing selection of cookbooks, many of which I'd never seen before. Lots of new cookbooks are coming out that use just simple, fresh, unprocessed foods ... and few to no bloating grains, legumes or pastas, which we have been eschewing for some time. (For some weird reason, I love the word "eschew" when it comes to things not eaten!)
So it was a marvelous treat to page through Mixt, a salad cookbook by Andrew Swallow. My Schreiber and Sons Brussels sprouts were, I knew, waiting at home ... and I couldn't wait to get there and make this salad!
BRUSSELS SPROUTS WITH WARM BROWN BUTTER VINAIGRETTE
Adapted from Mixt, by Andrew Swallow
Pomegranates hadn't quite hit the grocery stores when I made this, so I substituted fresh raspberries. But pomegranates are here now! Be sure to save your healthy bacon fat for use in other dishes.
1.5 pounds Brussels sprouts (yield 9 ounces leaves when separated)
8 strips uncured bacon, preferably from pastured pork, cut into 1-inch pieces; use 1/2 inch chunks if bacon is thick
1 tablespoon chopped fresh sage
1 tablespoon Dijon mustard
1/4 cup cider vinegar
1-1/2 tablespoons salted butter or ghee
1 organic Fuji apple, cored and sliced 1/8 inch thick
Salt and freshly ground pepper
1/2 cup pomegranate seeds
1 white turnip, julienned
Cut off the bottom of each sprout and peel off the leaves. I ended up with gorgeous little sproutlet hearts; use those, too!
Heat a pot of salted water to boil, and prepare a large bowl of ice water.
Blanch the sproutlet hearts for 1 minute; add to them the sprout leaves and blanch for 2 more minutes. Drain quickly and throw sprouts/hearts into the ice water. Set aside.
In medium skillet, fry bacon until perfectly crisp but not crumbly. Transfer bacon to a small bowl and set aside. Drain the bacon fat and reserve for other uses. Add butter or ghee to skillet and melt, then add sage and saute for a minute to flavor the butter. Turn off heat. Add mustard and vinegar, then whisk well.
Assemble salads: In serving plates, place sprout leaves/hearts. Add apple slices and toss. Drizzle vinaigrette over. Season with salt and pepper, and add bacon, pomegranate seeds (or raspberries) and turnips.
Serves three as a main course, four as a side.
Wednesday, November 2, 2011
Baron Farms Pot-Roasted Pork Loin in White Wine with Garlic, Fennel and Rosemary
Roast pork perfection ... thanks to Baron Farms. |
This is one of my favorite recipes ever. Still, you can play with it .... like I did with Jamie's recipe. Just be sure to start with local, pastured pork, such as this beautiful loin from Baron Farms in Wapato. Easily, theirs is the tenderest, most flavorful and succulent roast pork I've ever tasted.
BARON FARMS POT-ROASTED PORK LOIN IN WHITE WINE WITH GARLIC, FENNEL AND ROSEMARY
Adapted from The Naked Chef by Jamie Oliver
This is a rustic dish, and goes beautifully with a green salad, grilled vegetables, and chunky applesauce. My roast was about five pounds, and was bone-in. It roasted in about 2 hours. If your roast is boned, it will take less than the indicated time to cook.
1 3- to 5-pound local pastured pork loin roast, rolled and tied if flat
Salt and freshly ground pepper
1 tablespoon fennel seeds
Butter and/or olive oil, about two tablespoons
8 or more cloves garlic, peeled or not
A handful (or a couple of branches) of fresh rosemary
4 bay leaves
2 or 3 fennel bulbs, cored and sliced
Half a bottle of white wine (I used Badger Mountain Organic Chardonnay); more if you like
Fennel bulbs sometimes have discoloration on the bulbs. Just use a peeler to remove it, rather than wasting the fennel! The bulb on top has been lightly peeled. |
Throw in the garlic, rosemary, bay leaves, fennel slices, and wine. I wanted more juices, so I added a 12-ounce bottle of organic apple juice.
Here's your roast, ready to go into the oven. |
Remove roast to cutting board and slice. Remove rosemary, garlic skins (if left on) and bay leaves from juices. Arrange pork slices in shallow casserole and pour juice mixture over meat.
Serves 6 to 8, depending on size of your roast.
Monday, October 24, 2011
Colonel Mustard, with the Collards, in the Dining Room
Mustard greens (left) and collard greens, washed and ready to chop. |
Schreiber and Sons is the only local producer of mustard greens and collards that I've found. At the next-to-last Richland farmers' market of the season, I found these gorgeous, organic greens to be on sale, but only if bought in quantity. They were $3 per bunch, but only $1 per bunch if I would buy five bunches. I hesitated only for a moment, then loaded up my cart.
I could advance so confidently because I have devised a method to make these wonderful organic greens a part of more meals, with less work. Here's the plan for frozen, on-demand greens that will amaze and satisfy.
1) Get your hands on as many bunches of fresh mustard and collard greens as you can. I used my two giant bunches of mustard greens, and two of my bunches of collard greens. (If your greens have gone limp from being in the fridge too long, try this to revive them.)
2) Tear the collards from the stems. Wash the leaves and place in a large bowl. No need to spin dry. Run kitchen shears through the bowl, snipping to the bottom. Don't snip your fingers. In fact, keep your non-snipping hand out of the bowl, just to be safe. Alternatively, stack the leaves and slice, then chop them. Collards should be roughly chopped. Place them in a large pot.
3) Add a half inch or so of water to pot, sprinkle a little salt over all (I used 1 teaspoon of chipotle salt), and bring to a boil.
4) Cook collard greens for 15 minutes or so, adding water if necessary.
5) Meanwhile, trim the stem ends of the mustard greens, wash the greens and place them in a large bowl. You don't need to remove the mustard leaves from their stems; the stems are tender. Either chop the mustard greens with shears or make a neat pile of them and cut in strips. Reserve mustard green strips/pieces in the bowl; you're going to add them to the collards in the pot later.
6) When the collards have cooked 15 minutes, pile the chopped/sliced mustard greens into the pot on top of the collards. Sprinkle with another teaspoon of salt. Clap the lid on the pot and cook for 15 more minutes, stirring the mustard greens in as they cook down.
Soon you will have a pot of hot greens that looks like this. I stirred in a couple tablespoons of bacon grease, but that is optional; you could also use butter or olive oil.
The two white dishes in the rear of the picture are 1-1/2 quart Pyrex casseroles waiting to receive the greens for freezing. Fill your casseroles to your liking, or divide the greens into smaller containers for freezing. Evenly divide any remaining cooking liquid among the containers.
Cool, cover, refrigerate, then freeze your casseroles of greens. When frozen, run some hot water over them to loosen, then pop them into gallon-size Ziploc bags and return to the freezer.
This picture shows frozen greens prepared like this, but with prosciutto, onion and garlic added.
When you are ready to use your frozen disk of greens, get it out of the freezer and set aside for a bit. In a medium-sized skillet, saute onions and garlic in oil or fat of your choice. You may wish to use bacon or prosciutto, too. You could use sesame oil, ginger and garlic or curry paste for Oriental greens. Or go in another direction and sweeten things up with a little maple syrup or honey, and Dijon mustard. You can use cream or butter with nutmeg. Fresh or canned tomatoes are wonderful with greens. Thyme and other savory herbs go well, too. So do chopped toasted nuts, added just before serving. Your creativity is the only limit here.
When you have cooked your sauce ingredients to your liking, remove them from the skillet, then add the frozen greens with a little water and heat through until the greens are completely thawed and simmering hot. NOW pour your sauce back in over the greens, stir, and serve. Adding the sauce mixture at the last keeps bacon crispy and your sauce ingredients distinct and not overcooked.
There's nothing like dark, robust greens, with an interesting, flavorful sauce, to complement any other foods on your dinner plate. The spicy mustard greens lighten up the more sturdy collards. And you'll feel virtuous and fortified when you rise from the table!
Friday, September 23, 2011
Cajun-Portuguese Fusion: Bouillon Verde
The Autumnal Equinox is here, so ...it's soup time! I'm pretty sure Soup Peddler David Ansel titled his hilarious and fun-to-read cookbook Slow and Difficult Soups in response to the overused "Quick and Easy" that dozens of cookbooks seem to use these days. Most of David's soups, though, actually are quite simple and speedy to prepare.
Every year about this time I start thinking about Caldo Verde, a Portuguese soup made with linguica sausage and kale. That's why I picked up a package of AmyLu's andouille sausage at Costco the other day.
Yes, I know andouille is Cajun, but Costco didn't have linguica. Come to find out, I didn't have enough of my delectable Schreiber and Sons kale, either, so I subbed in some of their Brussels sprouts. Then I decided to add carrots, and some smoked paprika. Really, it became rather a soup free-for-all, which, I am happy to report, turned out splendidly.
So, herewith my Cajun-Portugese fusion soup. Caldo Verde is Spanish for green broth, which in French is bouillon vert, so we're calling this Bouillon Verde. Fair enough?
BOUILLON VERDE
Adapted from The Soup Peddler's Slow and Difficult Soups by David Ansel
The book calls for browning the sausages first, then sauteeing the veggies in the fat in the pan. My sausage was, unfortunately, rather low fat, so I couldn't do that. But if you have fatty sausage, browning it first is the way to go!
3 tablespoons ghee, butter or olive oil
2 onions, quartered and sliced into crescents
1/2 bunch kale, thick stems removed, leaves chopped
2 cups trimmed Brussels sprouts, coarsely chopped
8 andouille sausages, cut in about 1-1/2 pieces, at an angle for jauntiness
1 tablespoon smoked paprika
1/8 teaspoon crushed red pepper
a few grinds of black pepper
2 quarts chicken broth or stock
2 or 3 potatoes, peeled (or just well scrubbed, if they're organic), cut into 3/4-inch dice
6 fat carrots, peeled, cut in half lengthwise, and then into 3/4-inch dice.
1 head garlic (about 8 fat cloves), peeled and coarsely chopped
Salt as needed
Start off by heating the ghee in at least a 6-quart soup pot over medium heat. Add the onions, kale and Brussels sprouts as you prepare them, stirring occasionally. The veggies should begin to soften and perhaps even brown a bit.
Add the sausage pieces and stir, then stir in the paprika, crushed red pepper and black pepper, and cook a few more minutes.
Add the broth, potatoes and carrots, and half the garlic, and bring to a simmer. Cook for 15 minutes or so, then stir in the remaining garlic.
Cook 5 to 10 more minutes, or until the potatoes and carrots are tender. Taste for salt; whether to add any or not depends on the broth you use. I added 3/4 teaspoon and found it to be just right.
Makes about 8 servings
Every year about this time I start thinking about Caldo Verde, a Portuguese soup made with linguica sausage and kale. That's why I picked up a package of AmyLu's andouille sausage at Costco the other day.
Yes, I know andouille is Cajun, but Costco didn't have linguica. Come to find out, I didn't have enough of my delectable Schreiber and Sons kale, either, so I subbed in some of their Brussels sprouts. Then I decided to add carrots, and some smoked paprika. Really, it became rather a soup free-for-all, which, I am happy to report, turned out splendidly.
So, herewith my Cajun-Portugese fusion soup. Caldo Verde is Spanish for green broth, which in French is bouillon vert, so we're calling this Bouillon Verde. Fair enough?
BOUILLON VERDE
Adapted from The Soup Peddler's Slow and Difficult Soups by David Ansel
The book calls for browning the sausages first, then sauteeing the veggies in the fat in the pan. My sausage was, unfortunately, rather low fat, so I couldn't do that. But if you have fatty sausage, browning it first is the way to go!
3 tablespoons ghee, butter or olive oil
2 onions, quartered and sliced into crescents
1/2 bunch kale, thick stems removed, leaves chopped
2 cups trimmed Brussels sprouts, coarsely chopped
8 andouille sausages, cut in about 1-1/2 pieces, at an angle for jauntiness
1 tablespoon smoked paprika
1/8 teaspoon crushed red pepper
a few grinds of black pepper
2 quarts chicken broth or stock
2 or 3 potatoes, peeled (or just well scrubbed, if they're organic), cut into 3/4-inch dice
6 fat carrots, peeled, cut in half lengthwise, and then into 3/4-inch dice.
1 head garlic (about 8 fat cloves), peeled and coarsely chopped
Salt as needed
Start off by heating the ghee in at least a 6-quart soup pot over medium heat. Add the onions, kale and Brussels sprouts as you prepare them, stirring occasionally. The veggies should begin to soften and perhaps even brown a bit.
Add the sausage pieces and stir, then stir in the paprika, crushed red pepper and black pepper, and cook a few more minutes.
Add the broth, potatoes and carrots, and half the garlic, and bring to a simmer. Cook for 15 minutes or so, then stir in the remaining garlic.
Cook 5 to 10 more minutes, or until the potatoes and carrots are tender. Taste for salt; whether to add any or not depends on the broth you use. I added 3/4 teaspoon and found it to be just right.
Makes about 8 servings
Don't be afraid to buy these lovely branches of Brussels sprouts at Schreiber and Sons' booth at the farmers' markets. The sprouts pop off by hand quite easily. Just snap and twist. |
Wednesday, September 7, 2011
The Ritual Nectarine
You know how it is ... well, maybe I'm unique, but I doubt it.
Glorious weather. A spectacular hike experience. Sweltering and thirsty, you reach the hike midpoint, and pull up to the nearest log or rock to rest a spell and enjoy a magnificent view (which you have EARNED!).
You rummage around in your pack for that ripe-to-perfection Gilmore Farms nectarine you have wrapped carefully in a paper towel. One sweet, juicy, flavorful bite later, and you know that this is an experience you will never forget: endorphins high from being outdoors and hiking, nourishment and hydration flowing into you from one of the tastiest, juiciest fruits known to man. You want to have this experience again and again.
That happened to me several years ago on the hike to Upper Crystal Lake from Chinook Pass, and because we take this hike every year, I've made sure to repeat this ambrosial experience each time by packing a Gilmore Farms nectarine to look forward to. These photos are from this year's hike on September 4.
This hike is spectacular and perfect in every way. There are open hillsides, rocky shale, shady forests, cool lakeside resting spots, several great viewpoints, a high pass, flower-filled glades, and finally, views of Mount Rainier above Upper Crystal Lake.
Looking back at Chinook Pass from the trail. |
Sheep Lake lunch stop. Sourdough Gap is in the indention in the center of the photo, in the mountain ridge. |
A sampling of the flowery glades we passed by. |
Tiger lilies ... a rare sight. They're native to Washington State (a knowledgeable-looking hiker told me) and don't bloom for very long. |
And finally: The Nectarine View |
Logistics: Link to a map here. We like to start the hike by parking at Tipsoo Lake, just inside the (no-fee) entrance to Mount Rainier National Park. There are restrooms. Follow the trail shown on the map to Sheep Lake. There's another trail up to Sourdough Gap, through which you can proceed, taking the left-hand trail at the fork, to a small ridge, passing over which you will see Upper Crystal Lake and Mount Rainier.
And don't forget to pick up your Gilmore Farms nectarine (they're at Pasco, Richland and Kennewick Farmers' markets) before leaving home!
Friday, August 26, 2011
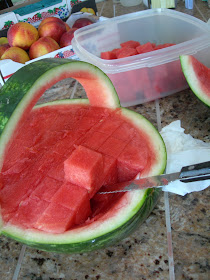
The Surprisingly Easy Watermelon Basket
Tonight we were invited to a gathering with no name or theme, or even an expressed purpose (hanging out with great people was implied). There would be food. We could bring something if we wanted. Well! With such nonexistent guidelines, I didn't know which way to turn. So I asked my group of friends last night at our Gals' Dinner Out what to do ... I was thinking about melons. Jeanne said, "Why not make a melon basket! It's easy!"
I laughed. Ha! I could just see the hash I'd make hacking around on a juicy melon, not to mention the low likelihood of ending up with something worthy of taking where Other People would actually see it.
But once again, as has been the case so many times (and I've blogged about many of them), I was entirely wrong. I tried it. And it worked.
May you all be so blessed with friends who have faith in you, and with the courage to do something outside your culinary comfort zone.
This was instinctive. To keep the melon from tipping, I sliced a bit off the side to keep it stable. |
With a smaller, slimmer knife, I cut the arch of melon out from under the basket handle, and started making cubes of the pieces as I cut them out. |
Cutting down into the bowl of the melon. This is a little tricky because of the curves. So I started saving the nicest-looking, most even cubes separately for the finished presentation. |
An ice cream scoop worked great for cleaning out the melon bowl. After that, it was just fill (least perfect pieces underneath, saved perfect cubes for the top), chill, and go! |
Saturday, July 30, 2011
Savoy Faire Slaw
You'd think the plethora of amazingly fresh local vegetables in summer, available at our area's FIVE weekly farmer's markets, would result in an endless cascade of posts on this, my local food blog. Ironically, though, the big push every day to use up the produce with which I've stuffed my fridge results in some hectic cooking, with little time left for blogging about it.
As well, long summer evenings don't lend themselves to sitting at a computer, but rather to being outdoors enjoying our balmy Tri-Cities weather and gorgeous sunsets! But I have a few things in the blog pipeline that are good enough to publish.
How could anyone not be inspired by this gorgeous local organic Savoy cabbage? I paired it with a creamy chive dressing found in one of my favorite cookbooks.
_______________________________
SAVOY FAIRE SLAW
Dressing inspired by Patricia Wells in Vegetable Harvest.
Savoir-faire is the French expression for "know how to do." You'll know just what to do with this slaw!
1 smallish head savoy cabbage
1/2 cup cream
1 tablespoon snipped chives
1 tablespoon lemon juice
1/4 teaspoon salt
Trim core from cabbage. Slice cabbage very thinly, then slice crosswise a few times so you have pieces about an inch long.
Whisk dressing ingredients in medium bowl. Add cabbage and mix well. Slaw will keep well but tastes fantastic freshly made.
Makes 4 servings
Monday, July 11, 2011
Undeservedly Good Shrimp Curry
Sometimes you want lip smackin' food with the minimum of effort. By "minimum," I mean practically no effort at all. Not just cutting corners, but eliminating them entirely.
To that end, I frequently employ some seriously slap-happy cooking practices that just possibly could get me banned from the food blogosphere. To be honest, the results aren't always blogworthy.
But this scrumptious dish calls for a little peek into the slam-dunk, get 'er done methods you can use to produce meals when you really don't feel like cooking. And when you didn't thaw anything ahead of time. When it absolutely, positively has to be on the table by six o'clock, and you started cooking at 5:45.
_________________________________
UNDESERVEDLY GOOD SHRIMP CURRY
Adapted from tasting the Valley Cafe's Spicy Asian Shrimp from our last visit there. You can use a 14-ounce can of coconut milk instead of the water and coconut cream, if you like.
25 tail-on (or tail-off ... your call) shrimp, frozen
1/2 cup chopped sundried tomatoes, in oil (I used Costco's, even though they have Italian spices!)
A few slabs (about 1/2 cup's worth) of coconut cream (see end of this post)
1 to 2 teaspoons red Thai curry paste
1/4 teaspoon (or more to taste) crushed red pepper
1 teaspoon salt
A few grinds black pepper
2 cups water
Green onions (or chives)
Fresh basil or mint (Mint was growing in a pot on the patio, so I used that)
Chopped fresh tomato, if you have it
Quickly rinse the frozen shrimp, pluck them from the rinse water, and lay them in a single layer in a medium skillet. Top with the sundried tomatoes, and arrange your coconut cream slabs around atop all. Add the curry paste, crushed red pepper, salt, black pepper and 2 cups water.
Turn heat on to medium high, and when things start to bubble a bit, stir everything around. Reduce heat a tad, but make sure it keeps simmering. The shrimp will begin to turn pink. Stir occasionally, and when shrimp are done, remove them with a slotted spoon to your serving dish.
Continue simmering the sauce until it's reduced about a third. If you used a can of coconut milk, reducing probably won't be necessary. Pour sauce over the shrimp, top with green onion (or chives), diced tomato, and basil or mint.
Makes 2 very hearty servings.