A batch of these grain-free delights is easy to make and keep in the fridge, and the cookies are a welcome sight on mornings when you don't feel like spending a lot of time cooking breakfast. The original recipe called for apple, but my lovely red CSA pears inspired me to try them instead.
Of course, there are many variations and options with fruit and spices for this cookie. As well, you can leave the fruit in dice and stir it in just before baking, for a fruit-studded cookie, or blend the fruit in for a smoother, sleeker cookie.
________________________________________________.
PEAR AND CARDAMOM BREAKFAST COOKIES
Adapted from This Primal Life
If you use use very large pears or apples, ultimately you'll have more liquid and thus a runnier batter. You want the batter to hold a cookie shape. If your fruit is very large, considering using half of it, or doubling the recipe.
1 cup almonds
3 dates (optional; the fruit makes the cookies nicely sweet)
Scant 1/4 teaspoon salt
1/4 teaspoon baking soda
1/2 teaspoon ground cardamom
2 tablespoons butter, ghee or oil
1 smallish CSA red pear, peeled, cored and diced
1/2 teaspoon vanilla extract
1 egg
Heat oven to 350 degrees.
Melt butter in small skillet, and cook the pear, stirring occasionally, until it is heated through and no longer crisp. It can still be firm. Remove from heat.
In food processor, process almonds and optional dates until a fine meal forms. Add salt, baking soda and cardamom, and pulse a few times.
Add eggs, vanilla, and pears, including any butter from the skillet, to food processor and pulse just until well mixed. Alternatively, transfer batter to a bowl and then stir in the pear chunks and liquid.
Drop by large spoonfuls on Silpat-lined baking sheet. Bake for 12 to 15 minutes, or until browned and firm. Remove to wire racks to cool.
Makes 4 large cookies (which is why I usually double the recipe! They keep well in the fridge.)
Showing posts with label Breads and Baking. Show all posts
Thursday, February 24, 2011
Wednesday, January 26, 2011
Grain Free Banana Bread
As part of our Gluten-Free January project, I've tried a few (very few) recipes for baked goods that will satisfy our acquired-over-decades taste for something ....well, baked.
I say "few" because one thing you don't want to do in a healthy diet is replace something unhealthy (white flour baked goods) with something grain free (made with almond flour, almond butter, etc.) and eat it in the same amounts as the white flour stuff.
Muffins, breads and pancakes made with almond butter or almond flour are superb, but they contain enough fat to boost your daily fat intake up to even the Primal Diet's 65 percent fairly quickly. Fortunately, they are also more satisfying and filling! Because they contain few to no concentrated carbs, they don't set you up for the never-ending, carb-craving cycle.
A slice of this bread for breakfast, with fruit, fits nicely into the overall scheme. The Smart Palette's recipe called for unsweetened chocolate chips, which I measured out and had standing by. But I forgot to put them in! I also forgot to sprinkle the top with date sugar, as called for!
No matter. A delicately banana-flavored and filling bread this is, indeed. You will be amazed that it is flour free.
______________________________________________
GRAIN FREE BANANA BREAD
From The Smart Palate, who adapted it from Grain-Free Foodies
2 ripe bananas, mashed
2 large eggs
1 cup unsalted almond butter
2 tablespoons freshly ground flax seeds (I used a blade coffee grinder)
1/2 teaspoon cinnamon
1/2 teaspoon vanilla
Generous pinch of fine sea salt
1/2 teaspoon baking soda
2 teaspoons apple cider vinegar or lemon juice
1/3 cup chopped unsweetened dark chocolate or unsweetened dark chocolate chips
1 teaspoon date sugar, for sprinkling on top
Preheat oven to 350 degrees. In medium mixing bowl, with electric mixer, combine bananas, eggs, almond butter, flax seeds, cinnamon, vanilla and salt. Blend very well; mixture should be quite smooth.
Add baking soda and vinegar and mix briefly. If desired, stir in chocolate.
Spoon batter into a greased (use butter, ghee, or coconut oil) small loaf pan. I used a small Pyrex loaf pan that measures 7-3/4" by 4-1/2". If desired, sprinkle date sugar atop batter.
Bake for 35 to 45 minutes, or until a toothpick inserted into the center of loaf comes out clean. Cool for 15 minutes on a rack, then gently loosen sides with a thin spatula, turn loaf out onto a cooling rack, and cool completely before slicing.
I say "few" because one thing you don't want to do in a healthy diet is replace something unhealthy (white flour baked goods) with something grain free (made with almond flour, almond butter, etc.) and eat it in the same amounts as the white flour stuff.
Muffins, breads and pancakes made with almond butter or almond flour are superb, but they contain enough fat to boost your daily fat intake up to even the Primal Diet's 65 percent fairly quickly. Fortunately, they are also more satisfying and filling! Because they contain few to no concentrated carbs, they don't set you up for the never-ending, carb-craving cycle.
A slice of this bread for breakfast, with fruit, fits nicely into the overall scheme. The Smart Palette's recipe called for unsweetened chocolate chips, which I measured out and had standing by. But I forgot to put them in! I also forgot to sprinkle the top with date sugar, as called for!
No matter. A delicately banana-flavored and filling bread this is, indeed. You will be amazed that it is flour free.
______________________________________________
GRAIN FREE BANANA BREAD
From The Smart Palate, who adapted it from Grain-Free Foodies
2 ripe bananas, mashed
2 large eggs
1 cup unsalted almond butter
2 tablespoons freshly ground flax seeds (I used a blade coffee grinder)
1/2 teaspoon cinnamon
1/2 teaspoon vanilla
Generous pinch of fine sea salt
1/2 teaspoon baking soda
2 teaspoons apple cider vinegar or lemon juice
1/3 cup chopped unsweetened dark chocolate or unsweetened dark chocolate chips
1 teaspoon date sugar, for sprinkling on top
Preheat oven to 350 degrees. In medium mixing bowl, with electric mixer, combine bananas, eggs, almond butter, flax seeds, cinnamon, vanilla and salt. Blend very well; mixture should be quite smooth.
Add baking soda and vinegar and mix briefly. If desired, stir in chocolate.
Spoon batter into a greased (use butter, ghee, or coconut oil) small loaf pan. I used a small Pyrex loaf pan that measures 7-3/4" by 4-1/2". If desired, sprinkle date sugar atop batter.
Bake for 35 to 45 minutes, or until a toothpick inserted into the center of loaf comes out clean. Cool for 15 minutes on a rack, then gently loosen sides with a thin spatula, turn loaf out onto a cooling rack, and cool completely before slicing.
Saturday, December 25, 2010
Western Dried Fruits Cake
A gem of a cake made entirely of nuts and dried fruits, with just enough vanilla-scented batter to hold it all together. Beautiful, jewel-like slices go wonderfully with coffee and tea, or on a plate of cookies and candies for dessert after a holiday meal.
This recipe came out in the 80's and I've seen many versions since then, varying the fruits and nuts, adding candied ginger and such. But for a pure, heavenly taste that unquestionably deserves all the superlatives you can give it, this original version is the ticket.
I've been making this cake in little foil pans for around 25 years now, and giving them as gifts. Merry Christmas!
___________________________________________________
WESTERN DRIED FRUITS CAKE
From Sunset Magazine
A couple of hints: Snip the apricots into quarters using kitchen shears. It's easier than using a knife. To butter the pans, use a brush dipped in melted butter; brush the butter onto the waxed paper lining also.
1 cup chopped pitted dates
2 cups quartered dried apricots
1 cup golden raisins
1-1/2 cups whole blanched almonds
1-1/2 cups walnut pieces
3/4 cup all-purpose flour
3/4 cup sugar
1/2 teaspoon baking powder
3 eggs
1 teaspoon vanilla
Butter a 5- x 9-inch loaf pan; line with baking parchment or waxed paper, then butter the paper.
In small bowl, combine flour, sugar and baking powder to blend.
In large bowl, combine dates, apricots, raisins, almonds and walnuts. Add flour mixture to fruits and mix evenly.
Beat eggs with vanilla to blend. Stir thoroughly into fruit mixture. Spoon batter into prepared loaf pan and spread evenly; press batter into corners of pan, and press batter down as you fill the pan so there are no gaps. Shape the batter so it's a bit rounded on the top of the loaf.
Bake in a 300-degree oven until golden brown, about 2 hours. Cool in pan on a wire rack for 10 minutes, then turn out of pan. Peel off paper and let cake cool on rack.
Wrap in plastic wrap or foil. Chill at least two days or up to two months. Or eat it immediately! The flavor is excellent fresh, too. If desired, sprinkle the top of the cake with 1 tablespoon rum or brandy once a week.
Makes 1 loaf
Gift loaves option: Double the recipe. Use six small foil loaf pans, about 3 x 6 inches. Butter and line pans as instructed above. Be sure to push batter into corners of pans and press down so the loaf is compact. Bake at 250 degrees (a cooler temperature than the big, single loaf) for 2 hours. Watch the cakes during the last hour to prevent burning. For these small loaves, I found that 300 degrees was too hot.
Thursday, September 16, 2010
Raspberry Cream Scones
For some reason, I always thought a "cream scone" meant that you sliced it and put clotted cream on it. But no. You put the cream, a whole delectable cup of it, right into the dough. This makes a scone that puts anything you'll find at Starbucks, or almost anywhere else, into oblivion.Be sure to use divine, local Pure Eire cream! Other fruits, fresh or dried, and nuts would work wonderfully here, I think. The key is to be quick and gentle when handling the dough.
RASPBERRY CREAM SCONES
Adapted from America's Test Kitchen Cookbook
2 cups all-purpose flour
1 tablespoon baking powder
3 tablespoons sugar
1/2 teaspoon salt
5 tablespoons chilled butter, cut into 1/2-inch cubes
1 cup heavy cream
1 cup raspberries
Adjust oven rack to middle position and heat oven to 425°F.
Place flour, baking powder and sugar in food processor. Pulse a few times to blend.
Scatter butter pieces evenly over dry ingredients. Cover and pulse (about 1 second per pulse) 10 times. Butter should be evenly chopped. Transfer mixture to large bowl.
Quickly stir in heavy cream using a rubber spatula, just until mixed and a dough begins to form, then gently and quickly fold in raspberries.
Gather dough and knead gently on a floured board for about 30 seconds. Flatten dough with you hands into an 8- or 9-inch round, then quickly cut the round into eight wedges, using a long, sharp knife or a pastry scraper. (You can cut rounds, as in biscuits, but the more you handle the dough the less tender it will become.)
Place scones on Silpat-lined or ungreased baking sheet and bake until tops are light brown, 12 to 15 minutes. Cool on wire rack for at least 10 minutes. Serve warm or at room temperature.
Makes 8 scones
Labels:
Berries,
Breads and Baking,
Desserts,
Local Milk and Cream,
Most Popular
Thursday, September 9, 2010
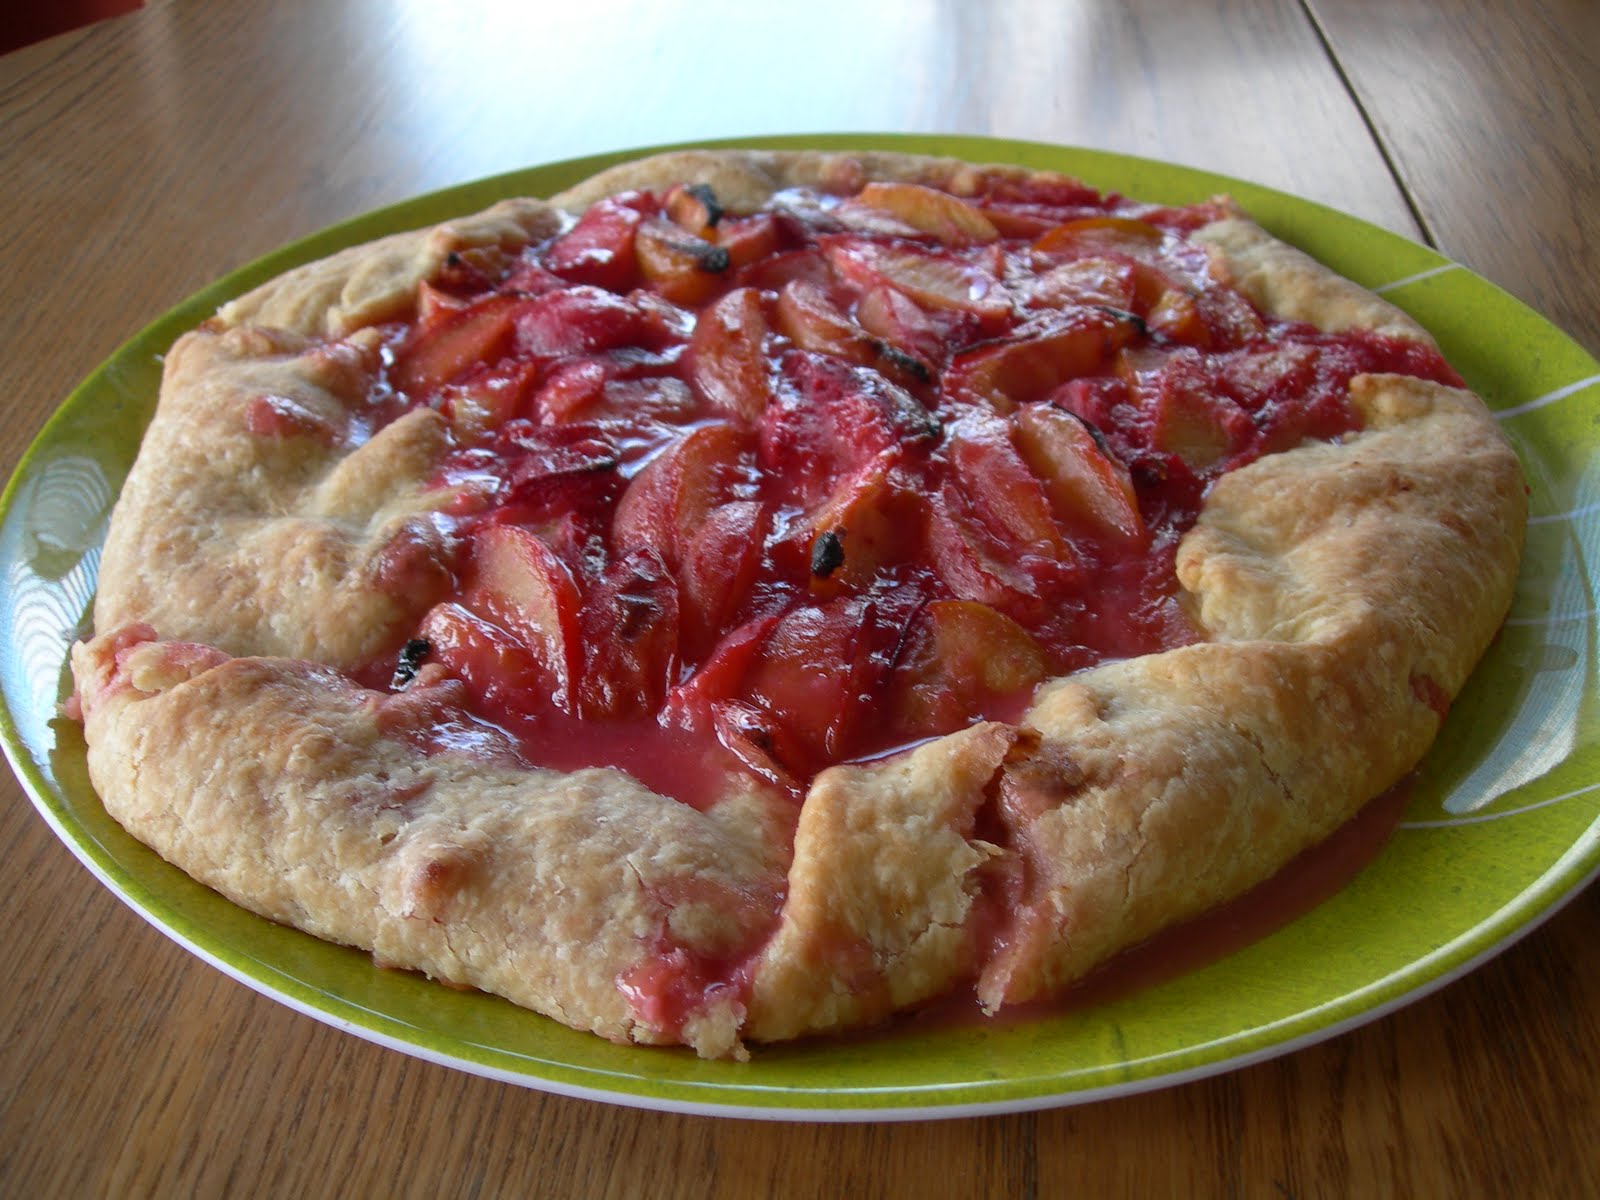
Rustic Tart of Local Plums
I admit to being somewhat beguiled by the word "rustic." I first saw it relating to edibles in a little bistro/pub in Twisp, Washington. "Rustic vegetable tart with cornmeal crust," the menu said.The word was used to justify having just gathered the pastry up around the filling, rather than rolling it out and putting it in a pan. Well, I'm all for labor saving, and if calling something rustic gives me carte blanche to do so, I say yea!
In fact, the French have legitimized the whole process by calling these casual pies "galettes." And that's fine with me, too.
RUSTIC TART OF LOCAL PLUMS
I can't remember where I found this recipe, but I've significantly altered it. The original called for sliced almonds to be stirred into the filling, Amaretto cookie crumbs (ridiculously expensive) to be scattered underneath the plums, and the pastry to be brushed with heavy cream and sprinkled with coarse brown sugar before baking. None of that, however, is necessary to produce a superb, memorable and delicious plum tart.
Pastry:
1-1/2 cups all-purpose flour
1 tablespoon sugar
1/2 teaspoon salt
7 tablespoons cold butter, cut into pieces
5 to 6 tablespoons cold water
Filling:
1/2 cup sugar (or less)
3 tablespoons all-purpose flour
1/4 teaspoon freshly ground nutmeg
2-1/2 pounds (about 8 large) not-too-ripe-or-juicy plums or pluots, pitted and cut into eighths
1 tablespoon lemon juice
Assembly:
1 egg, beaten
In food processor, combine flour, sugar and salt; pulse to mix. Add butter and pulse briefly just until coarse crumbs form. Add cold water and process in pulses until a loose ball of pastry forms. Add more water very gradually if necessary; the less you process the pastry, the flakier it will be. Gather pastry into a ball, flatten slightly, wrap in plastic, and refrigerate while you prepare the filling.
In large bowl, mix sugar, flour and nutmeg. Slice plums into a colander set over a plate. You don't want massively juicy plums for this recipe. Save the juicy ones to eat while standing over the kitchen sink!
Heat oven to 425 degrees F.
On a lightly floured board, roll out pastry to a 14-inch round. Gently fold pastry round into quarters and transfer to a baking sheet (with Silpat liner) and unfold the round. Brush the beaten egg in a circle in the center of the round, leaving about a 2-inch egg-free border.
Quickly stir plums into flour mixture, and add lemon juice. Pile plums quickly onto the center of the pastry, in the egged area (the egg seals the pastry and keeps the plum juices from softening the crust), and bring the sides of the pastry up around them.
Bake in middle of oven for 25 minutes, then check. If pastry is getting too brown, cover with aluminum foil. Bake another 15 to 20 minutes. Cool. Slice into 8 pieces and serve with creme fraiche, ice cream, or whipped cream.
Serves 8
Sunday, August 22, 2010
Buttermilk Seed Bread
My most dog-eared, splattered cookbook is Beth Hensperger's Bread for All Seasons. I don't bake much, but when I do, some great favorites come from this book. She has published many books about bread baking, and I have three of them. You simply can't go wrong with her recipes; this woman loves all that bread is about.One thing about homemade bread is that it makes wonderful gifts, and is usually welcome at potlucks, alongside a dish of fresh butter. Not many people bake bread, and it's a joy to see faces light up when a homemade loaf is presented.
I love breads that are chock full of whole grains, nuts, seeds and such. This bread is versatile and hearty. Use it for grilled cheese or BLT (or BAT) sandwiches. Toasted, it's sheer bliss, especially with homemade jams made of summer fruits.
BUTTERMILK SEED BREAD
Adapted from Beth Hensperger's Bread for All Seasons
You can vary the combinations of seeds; I usually leave out the sesame seeds and increase the amounts of pumpkin and sunflower seeds. Toast seeds carefully--they're easy to burn.
Mix and set aside:
1/2 cup bulgur (or 1/2 cup barley flakes, oats, etc.)
1/2 cup warm water
Toast in medium-hot skillet, stirring, until golden, fragrant and popping:
1 cup raw pumpkin seeds
1 cup raw sunflower seeds
1/4 cup sesame seeds (these toast faster; do them separately)
Mix in small bowl and let sit 10 minutes or so until frothy:
1 tablespoon (or 1 envelope) active dry yeast
a pinch of brown sugar or a dab of honey
1/4 cup warm water
Place in bowl of mixer with dough hook:
Toasted seed mixture
Soaked bulgur and its liquid, if any
1-1/2 cups buttermilk (or 1 cup milk and 1/2 cup yogurt)
1/4 cup canola oil or melted butter
1/2 cup honey
1/2 cup wheat bran
1 tablespoon salt
2 cups unbleached flour
Beat hard with dough hook for about 1 minute. Add yeast mixture and continue to mix, gradually adding another 2 to 4 cups flour as needed until dough begins to clean sides of bowl. Knead for 3 minutes, then begin checking for a good stringiness to the dough when you pull a bit away.
Gather dough into a ball and place in oiled bowl, turning to grease top of dough. Cover and let rise in warm place until doubled, 1-1/2 to 2 hours.
Punch dough down, shape into two round loaves, and let rise on Silpat-covered or greased baking sheet about 45 minutes. Heat oven to 375 degrees F. Slash tops of loaves a few times and bake for 15 minutes, then check for browning and cover tops of loaves with foil if they are getting too dark. Bake about 20 minutes more or until loaves sound hollow when tapped on the bottom. Place on cooling racks and cool completely before slicing.
If using a baking stone, place it on bottom oven rack, and the loaves on the rack just above it. Preheat the oven at least 30 minutes before baking so the stone gets hot.
Makes 2 luscious, crunchy, seedy loaves.
Thursday, August 5, 2010
Sourdough Buckwheat Pancakes

Well, who could resist trying this recipe? My stepson told me about the Whole Health Source website, and as I have an interest in baking with sourdough, this naturally-yeasted pancake recipe, and the information about buckwheat's nutritive values, caught my eye. That's a pretty impressive amount of complete protein.The batter produces neat little pancakes and plenty of bubbles so that they cook through. I used a little ghee on the griddle for each batch and I do recommend that to prevent sticking.
Mr. Eating the Scenery ate these for breakfast and pronounced them tasty. They are sturdy (as any whole grain bread should be!) and a tad bit chewy, but all in all quite satisfying. Next time I'll try making a thin "crepe" version to use for savory wraps.
__________________________________________
FERMENTED BUCKWHEAT PANCAKESFrom wholehealthsource.blogspot.com
This recipe, with quantities and alterations I give below.
You'll need raw, untoasted buckwheat (I found it at the local health food store), distilled or other non-chlorinated water, and salt.
Two cups of buckwheat made 18 four-inch pancakes.
I followed the instructions given, using 2 cups of buckwheat, distilled water to about 2 inches over it for the first soaking, and 1-1/4 teaspoons salt at the batter stage. (Author called for 2/3 teaspoon salt per cup of buckwheat, a very uncommon measurement! I adapted as best as my non-mathematical brain could.)
The first "fermenting" (for 12 hours) didn't produce any fermenty fragrance, but after washing the buckwheat thoroughly, making the batter, and fermenting it at room temperature for 24 hours, I did get a little tang.
Sunday, August 1, 2010
Tooth Cookies


It's not every day that one's stepdaughter graduates with a Bachelor's Degree in Dental Hygiene. We are so proud of her! This weekend's barbecue in her honor included these delicious sugar cookies ... the ONE time when the bright yellow color of our local eggs may not play to best advantage! Still, these probably look better than chocolate teeth cookies would have, an idea nixed by Mr. Eating the Scenery.Actually, the title of this blog came from my stepdaughter. Years ago, when her brother was eyeing the kale garnish on his plate in a restaurant, she told him, "Don't eat that--it's just scenery." Thus are family legends, and blog titles, born.
TOOTH COOKIES
Adapted from Epicurious.com
This dough really rolls and re-rolls nicely.
1 cup (2 sticks) unsalted butter, room temperature
1 cup organic sugar (original called for packed brown sugar; not a tooth color, I thought)
1 large egg
1 teaspoon vanilla
2-2/3 cups all purpose flour
1 teaspoon baking powder
1/2 teaspoon salt
1/2 teaspoon ground nutmeg
Cream butter and sugar until smooth. Beat in egg and vanilla. Add 2-1/3 cups of the flour, then scatter the baking powder, salt and nutmeg over the flour. Beat until mixed.
Spread 1/3 cup flour over a kneading surface, and knead it into the dough for about 1 minute. Add flour if the dough is too wet. The dough will be soft.
Flatten dough into a 1-inch thick rectangle. Cut into four equal pieces, wrap, and chill for at least 2 hours. If chilled longer, let soften a bit at room temperature.
Roll one piece of dough 1/8-inch thick, making sure to dust the dough with flour and turn it a time or two. Cut cookies, place on baking sheets (I used a Silpat; otherwise you may wish to use parchment) and bake for 10-11 minutes at 350 degrees or until cookies begin to show a little browning. Remove from oven, and let rest on baking sheets 5 minutes before placing cookies on cooling racks or paper towels.
Reroll scraps, blending them in with new dough you take from the fridge one piece at a time. Roll, cut, repeat.
When cooled, cookies may be stored between layers of waxed paper in an airtight container at room temperature.
Made about 16 4" x 6" cookies; will make more if the cookies are smaller, obviously!
Monday, June 7, 2010
Olde English Seed Cake
For bedtime reading, the Miss Read books can't be beat. A deep calm comes over one upon opening one of her books at the end of the day. Quiet English villages in the Cotswolds ... cottage gardens, eccentric characters, and never a day without tea. When someone falls ill in Fairacre or Thrush Green, "lemon barley water" is produced, a restorative believed to help strengthen a weakened constitution. It's simply lemonade made with water in which barley has been cooked, sweetened with honey.Seed cake is frequently offered at tea. In modern times, seed cake is merely a sponge cake with caraway or anise seeds added. It's still served at English teas. But its origins go back as far as the 1500's, when it was a yeasted, round cake. It's mentioned in Chaucer's Canterbury Tales, its round shape said to represent a medieval shield known as the Buckler.
Years ago my mom and I made a round skillet bread with caraway seed in it, called "San Francisco Firehouse Bread." That memory, plus the intrigue of making a recipe with a history going back to an age when books had titles like Book of Cookrye and The English Huswife, prompted me to do a little research and create this cake of seeded exquisiteness. Not something we often bake with, seeds bring a unique flavor as well as a gritty crunch.
Step back in time ...
OLDE ENGLISH SEED CAKE
Adapted from this website
I used a mixture of seeds; you can use all of one type if you wish, or a different mixture than mine. Make sure any mixture you use is a pleasing one.
1 package yeast
1/8 cup warm ale or water
1/2 cup (1 stick) organic butter
2/3 cup organic sugar
1/8 teaspoon salt
2 fresh, local eggs
2 teaspoons anise seeds
2 teaspoons caraway seeds
1/2 teaspoon cardamom seeds
1-1/2 cups regular flour
1 cup whole wheat flour
About 1-1/2 cups milk (I used some fresh, local buttermilk from this adventure!)
Heat oven to 350 degrees.
Sprinkle yeast over ale or water in a small bowl.
Crush seeds lightly with a mortar and pestle if you have one.
In food processor, cream butter, sugar and salt until smooth. Add eggs, seeds, flours, yeast mixture, and 1 cup milk. Blend JUST until smooth. You should have a thick batter. If needed, add remaining 1/2 cup milk.
Pour batter into buttered 8-inch round cake pan. (I used a buttered 8-1/2 inch springform pan.) Bake 45 to 55 minutes or until toothpick inserted in center comes out clean. Cool on rack for about 15 minutes before running knife around sides and turning cake out onto a plate.
Makes 8 servings.
Tuesday, May 25, 2010
Lemon, Almond and Rosemary Cake

Crazy Water, Pickled Lemons is my go-to cookbook for lush, inspiring photographs and recipes. Whenever we have a lightning storm, I get out this cookbook ... because once I was reading it when a lightning storm with drenching rain struck, and somehow a full-circle connection was created between nature's majesty, me, and this book. It leans definitely to the Middle-Eastern, and ever since that last big storm we had a while back, I've been thinking about trying this cake. I used homemade sourdough bread that already had rosemary in it, organic lemons, organic sugar, and my luscious local eggs.The author suggests serving it with berries, but my little patch of strawberries is just beginning to produce, so we augmented them with mango when it came time to partake. This cake has a wonderfully grainy texture, a sweet lemony tang, and an exotic, Middle-Eastern syrupy aspect, all infused with the woodsy essence of rosemary.
I know it's not health food, but it's soul food.
LEMON, ALMOND AND ROSEMARY CAKE
Adapted from Crazy Water, Pickled Lemons by Diana Henry
For the cake:
2 ounces stale white bread (3/4 cup crumbs)
3-1/2 ounces (3/4 cup) blanched almonds (non-blanched work fine, too)
2 teaspoons rosemary leaves
3/4 cup sugar
Grated zest of 1 lemon
3/4 cup olive oil
4 local, free-range eggs
2 teaspoons baking powder
For the syrup:
Juice of 2 lemons
1/2 cup water
1/3 cup sugar
2 sprigs rosemary
Butter bottom and sides of an 8-1/2 inch springform pan. I think you could also use an 8-inch square Pyrex pan, or similar cake pan, if you butter it generously, flour it as well, and run a knife around the edge of the pan when releasing the baked cake.
In food processor, grind bread, almonds and rosemary as finely as possible. Add sugar, lemon zest, olive oil and eggs, and pulse as briefly as possible, just to blend. Add baking powder and pulse very briefly, just until until baking powder is incorporated.
Pour batter into prepared pan, put into a cold oven and turn oven on to 350 degrees. Bake for 45-50 minutes or until cake is brown and a toothpick inserted int he center comes out clean. Cool cake for 10 minutes, then turn it out onto a plate.
While cake is baking, make syrup. Combine all ingredients in a small saucepan and heat, stirring to dissolve sugar. Turn heat up and boil syrup for 5 minutes, then remove from heat. Leave rosemary in to infuse.
Pierce holes in the warm cake, and pour the syrup evenly over. Serve with berries, other fruit, yogurt, ice cream, or any other accompaniments that strike your fancy.
Makes 8 servings.
Monday, April 19, 2010
Slow Food Breadmaking Class
On Saturday, the first ever Slow Food Breadmaking Class got rolling at 9:00 a.m. with six students and three presenters. We learned breadmaking techniques, and shaped and baked personal artisan boules from dough Angela brought. Tracy showed us how to mix and knead molasses-wheat bread, and we shaped little loaves of it to take home and bake.We also ate a lot of bread! We tasted limpa, molasses-wheat, Ashland bread, chai bread (Angela wants to try it with rye so she can call it chai rye), rosemary sourdough, and 100% whole wheat rolls made from fresh-ground wheat.
As everyone knows, homemade bread is all good, but FRESH homemade bread is ethereal. Using the methods they've been experimenting with from Artisan Bread in Five Minutes a Day, Tracy and Angela showed us how to keep a bowl of fresh bread dough in the fridge for two weeks, during which time a hunk of it can be shaped and baked anytime you wish. Who isn't for saving work but getting great bread at the same time? Wonderful stuff. And no kneading! Just mix, refrigerate, and the dough is there when you have a hankering for a fresh, crusty loaf.
As always, successful breadmaking results in the desire to experiment further, and try new things. Angela and Tracy are thinking about Healthy Bread in Five Minutes a Day for their next area of exploration.
Becky talked about her sourdough and wheat-grinding experiences and handed out little containers of sourdough starter for interested bakers. This starter's life began in Becky's parents' grape vineyard ... the yeast was obtained from grapes submerged in flour and water according to the method used in Nancy Silverton's Breads from LaBrea Bakery.
It's an amazing experience to share three hours in a kitchen with eight enthusiastic people who love food, bread, and baking. Hosting a Slow Food class is highly recommended!
Here's our group, except for Angela, who's shown in the next picture taking our artisan boules from the oven. (L-R: Darci, Cathy, James, Tracy, Becky, Madeleine, Peggy, and Lisa.)

Monday, January 25, 2010
Smoky Barley-Corn Thyme Muffins

I've been looking at the seven-bean mix and the pearl barley for some days now. What should it be? Bean and Barley Soup? Barley and Bean Salad with Red Onion? Barley Risotto with Indian spices and dried fruit? Should I grind the barley into flour and make bread or muffins? I chewed a few grains of the barley, and they were nutty and mellow.Today I needed to bake. You know? Sometimes all the modern-day angst about carbs just needs to take a back seat. So, instead of making a vegetable-laden, light and modified recipe designed for health, I made these smoky, savory, satisfying muffins.
You could go in a lot of different directions with these: different flours, herbs, nuts, seeds, cheeses ... in fact, I modified the original recipe pretty heavily to do just that.
The original recipe called for 1-1/2 cups buttermilk; I never have that around, so used a combination of yogurt and milk instead.
_________________________________________
Adapted from Whole Grains Every Day by Lorna Sass
2/3 cup barley flour (grind 1/2 cup CSA barley in a blade coffee grinder for a couple of minutes)
1/3 cup cornmeal
1 cup regular flour
2-1/4 teaspoons baking powder
1/2 teaspoon baking soda
1-1/2 teaspoons dried thyme
1 tablespoon sucanat or brown sugar (or use honey in the wet ingredients)
1/2 cup grated smoked goat gouda cheese
2 large, local eggs
1 cup yogurt
1/2 cup milk
1/4 cup olive oil
Butter a 12-muffin tin. You can use paper cups, but I have found that taking the time to butter the tin gives you nice, crusty muffin sides, and they come out easier.
Preheat oven to 400 degrees.
In large bowl, combine dry ingredients, then stir in cheese. In a smaller bowl, beat together wet ingredients well. Quickly stir the wet ingredients into the dry, just until mixed, then spoon into muffin tin.
Bake 12 to 15 minutes or until toothpick inserted in a muffin comes out clean. Remove from oven and let set for a couple of minutes, then twirl the muffins up and lay them sideways in the tin to cool.
Subscribe to:
Posts (Atom)