Showing posts with label Most Popular. Show all posts

Friday, November 19, 2010

Shepherd's Pie with Yams and Curry

A cultural crossover here ... not your typical English version of the Shepherd's Pie, but an exotic cousin.  Warm, spicy, savory and sweet.  A brilliant one-dish meal that is hearty and happily filling. 
________________________________________
SHEPHERD'S PIE WITH YAMS AND CURRY
Adapted from The Organic Foodie

I had a few mushrooms that needed to be used up and added them to the meat mixture.  They really rounded the dish out nicely.  I considered using ground lamb, but am glad I didn't.  The beef's milder flavor really lets the spicy ginger and curry flavors dominate.

2 large yams, peeled and cut into 1-inch chunks
2 teaspoons coconut oil
1 teaspoon cinnamon
1/2 teaspoon salt
1/3 cup unsweetened fine-shred coconut

2 teaspoons coconut oil
1 pound lean ground beef (I used Thundering Hooves)
1 yellow onion, diced
1 tablespoon curry powder
1-inch piece of ginger, minced
2 large garlic cloves, minced

1/2 cup raisins (optional; I didn't use them)
1 packed cup of chopped spinach (didn't have this so used 1/3 cup cilantro - very good!)
1/4 cup almonds, finely chopped
two pinches ground cardamom
one pinch salt

Cook yams in a pot of boiling water until soft.  Mash until smooth.  Stir in until well blended the coconut oil, cinnamon, salt and coconut.

Mix almonds with cardamom and pinch of salt.  Small food processor works great for this.

In medium skillet, heat coconut oil.  Add onion and cook until onions begin to soften.  Sprinkle curry powder over onions and cook, stirring, for a minute.   Add ground beef and continue cooking until beef is thoroughly cooked.  Add ginger, garlic, spinach or cilantro, and (if using) raisins.

Place meat mixture in 10-inch Pyrex pie dish or other similar dish.  Spread yam mixture over top, and sprinkle with almond mixture.

Bake at 375 degrees for 30 minutes until heated through and almonds are a bit toasted.    Let sit for a few minutes after removing from oven.

Makes 4 hearty servings or 6 smaller ones.

Saturday, November 6, 2010

Save the Pickled Beets!

Sometimes, but not so much lately, I worry about foods disappearing.  I know, some foods should disappear, like fried liver and doorstop fruitcakes.  But you know what I mean:  You're savoring a lovely slice of spicy pickled beet and suddenly, without warning, you think, "What if people stopped eating beets?  And farmers stopped growing beets?  And there would be no more pickled beets!"

I'm not saying everyone has episodes of food paranoia like me, but in case the whole worrying-about-food-disappearing thing is due to the cosmic resonance of some underlying potential universal truth, now and again I like to make, and enjoy, pickled beets. And if you do it, too, maybe we'll keep pickled beets alive!
____________________________________________
PICKLED BEETS

This recipe is easily increased for more beets, and all the ingredients can be played around with according to your taste.  Makes about a quart.  If you put striped or golden beets in with red ones, the whole mixture will be more or less red!

About 6 medium-sized beets, or 12 smaller ones, either red, gold, striped, or a mix
2/3 cup cider vinegar
1 or 2 tablespoons agave nectar or organic sugar (I sometimes use apple juice concentrate)
1/2 teaspoon salt
1 tablespoon horseradish
1/4 teaspoon ground cloves
A few grinds of black pepper

Wash the beets and either trim the stalks off or leave an inch or so on.  Lay beets on an aluminum foil-covered pan and roast at 350 degrees for an hour or so.  If beets are varying sizes, some may need to be removed before others are done.  Beets should be tender when pierced with a knife.

Alternatively, wrap the beets in aluminum foil and roast for the same amount of time.

Alternatively again, boil the beets in a big kettle of water until they are tender when pierced with a knife.  This is the method I use most often, because the beets peel more easily than they do when roasted.

Cool the beets, and trim off the stems and root ends and any weird spots.  Rub the peelings off (a paper towel works nicely for this) and cut the beets into your preferred shapes ... slices, dices, you call it.  Toss them into a quart jar.  You can have the vinegar and spice mixture already in the jar, or you can toss it in on top of the beets and shake gently.  Store in fridge, turning and tossing jar gently now and then to keep the beets coated in the pickly mixture.  They'll be pickled in about a week. Enjoy without fear.

Saturday, October 23, 2010

Cabbage Soup with Sausage and White Wine

Two things captivated me when I spotted this recipe years ago.  It called for two cups of white wine, which I felt sure would elevate a simple cabbage soup well beyond being brothily boring, and the cooking instructions said to cook "until the cabbage is redolent and tender."  I cannot resist words like "redolent."

A truly easy yet extraordinarily savory and memorable fall and winter soup.
_______________________________________________
CABBAGE SOUP WITH WHITE WINE AND SAUSAGE
Adapted from The Kitchen Garden Cookbook by Sylvia Thompson

The original recipe was a stew, and used only one cup of chicken broth.  My other additions are the red bell pepper, crushed red pepper, and smoked paprika. The recipe also states that "a Czech or Pole would also season the stew with a good pinch of caraway seeds." Though not of either of those persuasions, I do grind some caraway seed a tad with mortar and pestle and sprinkle atop the soup when serving.

2 tablespoons olive oil
4 large or 8 small carrots, diced
1 large red onion, diced
2 tomatoes, diced, or 1 14-oz. can diced tomatoes, undrained
1 tablespoon fresh thyme, or 1 teaspoon dried thyme (I usually add quite a bit more thyme)
6 cloves garlic, chopped

1 small head green cabbage, cut into 1-inch chunks
1 pound sausages, cut into 1/2-inch pieces, or larger if you prefer
2 cups dry white wine
2 cups good chicken broth
1 teaspoon smoked Spanish paprika
Freshly ground black pepper

Boiled potatoes and sour cream or yogurt for serving


Heat olive oil in large soup pot.  Add carrots and onions and saute for several minutes.  Add tomatoes, thyme and garlic, and heat through.

Pile the cabbage on top of the vegetables, and scatter the sausage atop the cabbage.  Pour wine and broth over, and sprinkle with the paprika.  Bring to a boil, then reduce heat and simmer for 40 minutes, stirring the mixture all together at 20 minutes.  When the cabbage is "redolent and tender," add pepper, taste for salt (I usually add about 1/2 teaspoon), and serve over boiled potatoes.  Top with sour cream or yogurt if you wish.

Tuesday, October 12, 2010

Butternut Squash, White Bean and Kale Ragout

The farmers' markets are bursting with squashes and greens right now.  Who am I to resist them?  It's fall, after all, even if our warm temperatures belie the fact.

For sheer fall robustness and mellow flavor, this ragout fills the bill beautifully.  Both dinner guests immediately responded postively when I offered to send some of  it home with them.  And later I added chicken broth to my leftover portion to make soup with a marvelously maple-y and squash-y depth of flavor.  A delicious and versatile dish.
_______________________________________________
BUTTERNUT SQUASH, WHITE BEAN AND KALE RAGOUT
From the New York Times, 11/14/07


1 3-pound sugar pumpkin or butternut squash
2 tablespoons melted butter
2 tablespoons maple syrup
2-1/2 teaspoons cider vinear
1 teaspoon kosher salt, more to taste
1 teaspoon ground black pepper
Pinch cayenne pepper

2 tablespoons olive oil
4 large leeks, white and light green parts only, cleaned and chopped
2 large garlic cloves, minced
2 teaspoons chopped fresh rosemary

2 15-ounce cans cannellini beans, drained and rinsed (or 3 cups cooked white beans)
2 cups vegetable broth

3/4 pound kale, ribs removed, leaves thinly sliced (about 6 cups)
1/2 cup Parmesan cheese, or more to taste
1/3 cup dried cranberries
Coarse sea salt

In small saucepan, stir together 2 over medium heat 2 tablespoons butter, maple syrup, vinegar, 1 teaspoon salt, 1 teaspoon black pepper, and pinch cayenne. Pour into large bowl.

Peel butternut squash, remove seeds, and cut flesh into 1-inch cubes. Toss cubes in maple syrup mixture 'til coated.  Spread squash cubes on a large, rimmed baking sheet.  Roast, turning occasionally, until squash is tender when poked and a bit caramelized at the edges, about 30 minutes.

In large skillet, heat 2 tablespoons olive oil, and add leeks, garlic rosemary and a large pinch of salt.  Cook, sitrring occasionally, until leeks are very soft but not browned, about 15 minutes.  Add beans and broth and simmer for 10 minutes.

Stir kale and cheese (if using) into leek mixture, and simmer until kale is cooked down and very tender, about 10 minutes.  Stir in the roasted squash cubes and cranberries.  Taste for salt and pepper.  Garnish with additional cranberries if desired.

Serves 6 to 8

Monday, September 20, 2010

Chilis Rellenos Americanos


I have always loved chilis rellenos. Authentic recipes call for dipping the whole cheese-stuffed poblano pepper into egg batter and deep frying it. The stem end is left on for a very rustic experience.

Over the years I reserved chilis rellenos for special occasions when eating out, and never made them at home. Then, about six years ago, I decided to come up with my own recipe, one that would satisfy but be less greasy. I've made it many times, always in the summer when the poblano peppers start appearing at the farmers' markets.

The dish is wonderfully warm, smoky, chile-y, eggy and satisfying. It would make a great breakfast casserole, but I usually serve it with cornbread and coleslaw for dinner.

Be warned that roasting peppers indoors WILL set off your smoke alarms. At the Richland Farmers' Market, there's a vendor who will roast your peppers over a gas flame while you wait. It doesn't take long, but you'll want to get right home and refrigerate the roasted peppers 'til you're ready to use them.
____________________________________________
CHILIS RELLENOS AMERICANOS

Smoky chipotle salsa is simply a can of chipotle peppers "en adobo" (sauce), which you puree and store in the fridge. This little jar of smoky heat will come in handy for a lot of dishes.

6 or 8 poblano peppers (you may see these incorrectly called "pasilla" peppers)
16 ounces or so grated jack, pepper jack, cheddar, or a mixture of cheeses you like (smoked gouda gives the finished dish a more smoky flavor)

8 eggs
1/2 cup milk
1/4 teaspoon salt
1/8 teaspoon crushed red pepper

Sliced green onions if you have them
Smoky chipotle salsa, about 1 tablespoon

Wash the peppers and cut the stems off. Reach down into the center and remove the seeds. If using a pepper roaster over a gas flame, turn on your exhaust fan. Arrange about three peppers at a time over the flame so they get maximum exposure. As skins start to pop and char, turn to expose all sides and, when peppers are charred evenly, toss them into a bowl lined with a paper towel, and cover them immediately. Roast remaining peppers and let them cool gradually in the covered bowl for 15 to 20 minutes.

Alternatively, arrange peppers on oven rack and turn oven to 500 degrees. Turn on exhaust fan. Roast peppers 'til skins start to pop and char; turn if necessary. Continue with step calling for putting them in a paper-towel-lined bowl and covering them. You can also place them in a brown paper bag, rolling the top down closed.

Rub the peppers to remove the black char as much as possible. Lay them out on your work surface.

Beat eggs with milk, salt and crushed red pepper until very well blended.

Set aside some of the grated cheese to sprinkle on the top of the dish. Form remaining grated cheese into fists, as many as you have peppers. Gently open the peppers and put the cheese into the cavity. Arrange peppers in a casserole, and pour the egg mixture over. Scatter sliced green onions on top.

Bake casserole at 375 degrees for 15 minutes, then lower heat to 350 degrees and bake for 20 minutes, or until knife inserted into egg mixture comes out clean.

Drizzle smoky chipotle salsa over the top, then brush it around to coat top of casserole. Sprinkle reserved cheese atop, and serve.

Makes 6 to 8 servings, depending on how many peppers you used.

Sunday, September 19, 2010

Eggplant and Potato Gratin


A total departure from cheesy gratins, this dairy-free recipe is one of those serendipitous discoveries that I can't imagine not having found. I make it every year about this time when all the fresh vegetables in it start showing up at the farmers' markets. Everything in this dish except the olive oil, salt and pepper was locally grown.

This gratin truly illustrates the rich depth and mingling of flavors achievable with a simple preparation and ingredients that compliment each other. Be sure to use a really good olive oil.
_________________________________________
EGGPLANT AND POTATO GRATIN
From The Vegetarian Bistro by Marlena Spieler

If time is short or you are using potatoes that take longer to cook, like Yukon Golds, you can microwave the casserole for about 15 minutes to get it heated up, then put it in the oven to finish.

1 onion, thinly sliced
1 red bell pepper, seeded, deribbed and cut into strips
4 tablespoons olive oil, plus more as needed

1 cup drained, diced tomatoes
3 garlic cloves, minced
Several large pinches of dried thyme (be generous here)

1 eggplant, stem end trimmed, sliced lengthwise 1/8- to 1/4-inch thick
2-1/2 pounds potatoes, peeled and thinly sliced

Salt and freshly ground pepper

Using 2 tablespoons of the olive oil, saute the onion and red pepper in a medium skillet 'til softened, about 5 minutes. Add the tomatoes, two thirds of the garlic, salt to taste, and the thyme. Cook briefly and set aside.

Brush or rub eggplant slices with olive oil on both sides, and cook them on a griddle until lightly browned on both sides. Alternatively, broil the slices under the broiler. I suspect you could get away with not pre-grilling the eggplant slices, but I haven't tried it.

Preheat oven to 375 degrees. Lightly oil a 3- or 4-quart casserole dish. Place one third of the potatoes in a layer on the bottom, and sprinkle them with salt and pepper. Layer on half the eggplant, another third of the potatoes, and the remaining eggplant.

Spread the tomato mixture over the eggplant, then toss the remaining potatoes in a bowl with the remaining garlic and olive oil, and spread them over the eggplant.

Sprinkle the final potato layer with salt and pepper, and drizzle with a little olive oil.

Bake for 1 hour or until the top is golden and the potatoes are cooked through. Cover with foil if top gets too brown before potatoes are done. Test by inserting a paring knife down through the center of the gratin; it should meet little resistance. Serve hot or at room temperature.

Makes 4 to 6 servings

Thursday, September 16, 2010

Gyros!

Yes! You can make delicious gyros meat that goes wonderfully with the tomatoes, cucumbers and onions of the season. I had seen this recipe, and the tzatziki recipe that goes with it, some time ago, and finally decided to try it.

Local lamb and beef are, happily, quite available at our farmers' markets. You can also order from Thundering Hooves in Walla Walla, and they'll bring the order to a drop point in the Tri-Cities.

Honestly, this gyros meat is actually fun to make, is wonderfully delicious, and while it's baking will make your kitchen smell like a Greek restaurant!
__________________________________________
GYROS
Gyros and tzatziki recipes adapted from Velveeta Ain't Food

1 pound ground lamb
1 pound ground beef
2-1/2 teaspoons kosher (coarse) salt
1-1/2 teaspoons dried oregano

1 large yellow onion
2 large cloves garlic
4 slices bacon

Combine lamb, beef, salt and oregano with your hands. Wrap or cover and chill for at least 2 hours. This is important!

Line a small broiler tray with foil, poking holes in the foil so the fat will have a place to drain.

Preheat oven to 325 degrees. In a food processor, pulse the onion, garlic and bacon until pureed. Add the lamb/beef mixture and puree, scraping down sides as needed, until you have a smooth paste. Yes, it is not going to be attractive!

Gather meat into a rough loaf shape with you hands and place it on the foil-lined broiler tray. Shape it into a loaf that is about 2 inches thick; this will result in a loaf length of about 9 inches and width of 5 inches or so.

Place meat on middle rack of preheated oven and bake for about 1 hour or until it has an internal temperature of 155 degrees. Let loaf cool. I refrigerated mine and sliced it after it had chilled; this probably made it easier to slice.

Cut chilled loaf into 1/4-inch slices. Broil slices about six inches from broiler for about 4 minutes per side, or until meat is becoming crispy and browned.

Serve with tzatziki (below), and diced, fresh tomatoes, onion and cucumber. If you'd like a traditional gyros sandwich, you can make a thick flatbread (not pita bread) such as naan, and enfold your gyros meat and condiments in a bready enclosure. I served tabouli salad and decided not to use bread, and we didn't miss it.

Makes 28 1/4-inch slices, about six servings

TZATZIKI

3/4 cup plain low-fat yogurt
2 tablespoons mayonnaise
1 medium clove garlic, pressed or finely chopped
2 tablespoons lemon juice
3 tablespoons cilantro, chopped (or mint)

Mix all ingredients and refrigerate until ready to serve.

Raspberry Cream Scones

For some reason, I always thought a "cream scone" meant that you sliced it and put clotted cream on it. But no. You put the cream, a whole delectable cup of it, right into the dough. This makes a scone that puts anything you'll find at Starbucks, or almost anywhere else, into oblivion.

Be sure to use divine, local Pure Eire cream! Other fruits, fresh or dried, and nuts would work wonderfully here, I think. The key is to be quick and gentle when handling the dough.
_____________________________________________
RASPBERRY CREAM SCONES
Adapted from America's Test Kitchen Cookbook

2 cups all-purpose flour
1 tablespoon baking powder
3 tablespoons sugar
1/2 teaspoon salt

5 tablespoons chilled butter, cut into 1/2-inch cubes

1 cup heavy cream
1 cup raspberries

Adjust oven rack to middle position and heat oven to 425°F.

Place flour, baking powder and sugar in food processor. Pulse a few times to blend.

Scatter butter pieces evenly over dry ingredients. Cover and pulse (about 1 second per pulse) 10 times. Butter should be evenly chopped. Transfer mixture to large bowl.

Quickly stir in heavy cream using a rubber spatula, just until mixed and a dough begins to form, then gently and quickly fold in raspberries.

Gather dough and knead gently on a floured board for about 30 seconds. Flatten dough with you hands into an 8- or 9-inch round, then quickly cut the round into eight wedges, using a long, sharp knife or a pastry scraper. (You can cut rounds, as in biscuits, but the more you handle the dough the less tender it will become.)

Place scones on Silpat-lined or ungreased baking sheet and bake until tops are light brown, 12 to 15 minutes. Cool on wire rack for at least 10 minutes. Serve warm or at room temperature.

Makes 8 scones


Saturday, September 11, 2010

The Pluot Thickens ...


Buy lots of deep-red, organic Dapple Dandy pluots
from Gilmore Farms at Farmers' Market
Let pluots get really soft and juicy
Wash pluots
Pit and quarter pluots over a pan to catch juices
Simmer 'til soft
Add a splash of lemon juice
Cool

Freeze in containers for a remarkably flavorful, jewel-crimson sauce that in deep winter will awaken your memories of summer. Layer the pluot sauce with Coconut Quinoa Pudding. Serve it atop ginger ice cream. Brighten up your morning cereal with a slathering. Heat it up and add Dijon mustard, salt and pepper for a sumptuous sauce for pork.

Or just eat it. Sometimes the simplest thing really is the best.

Thursday, September 9, 2010

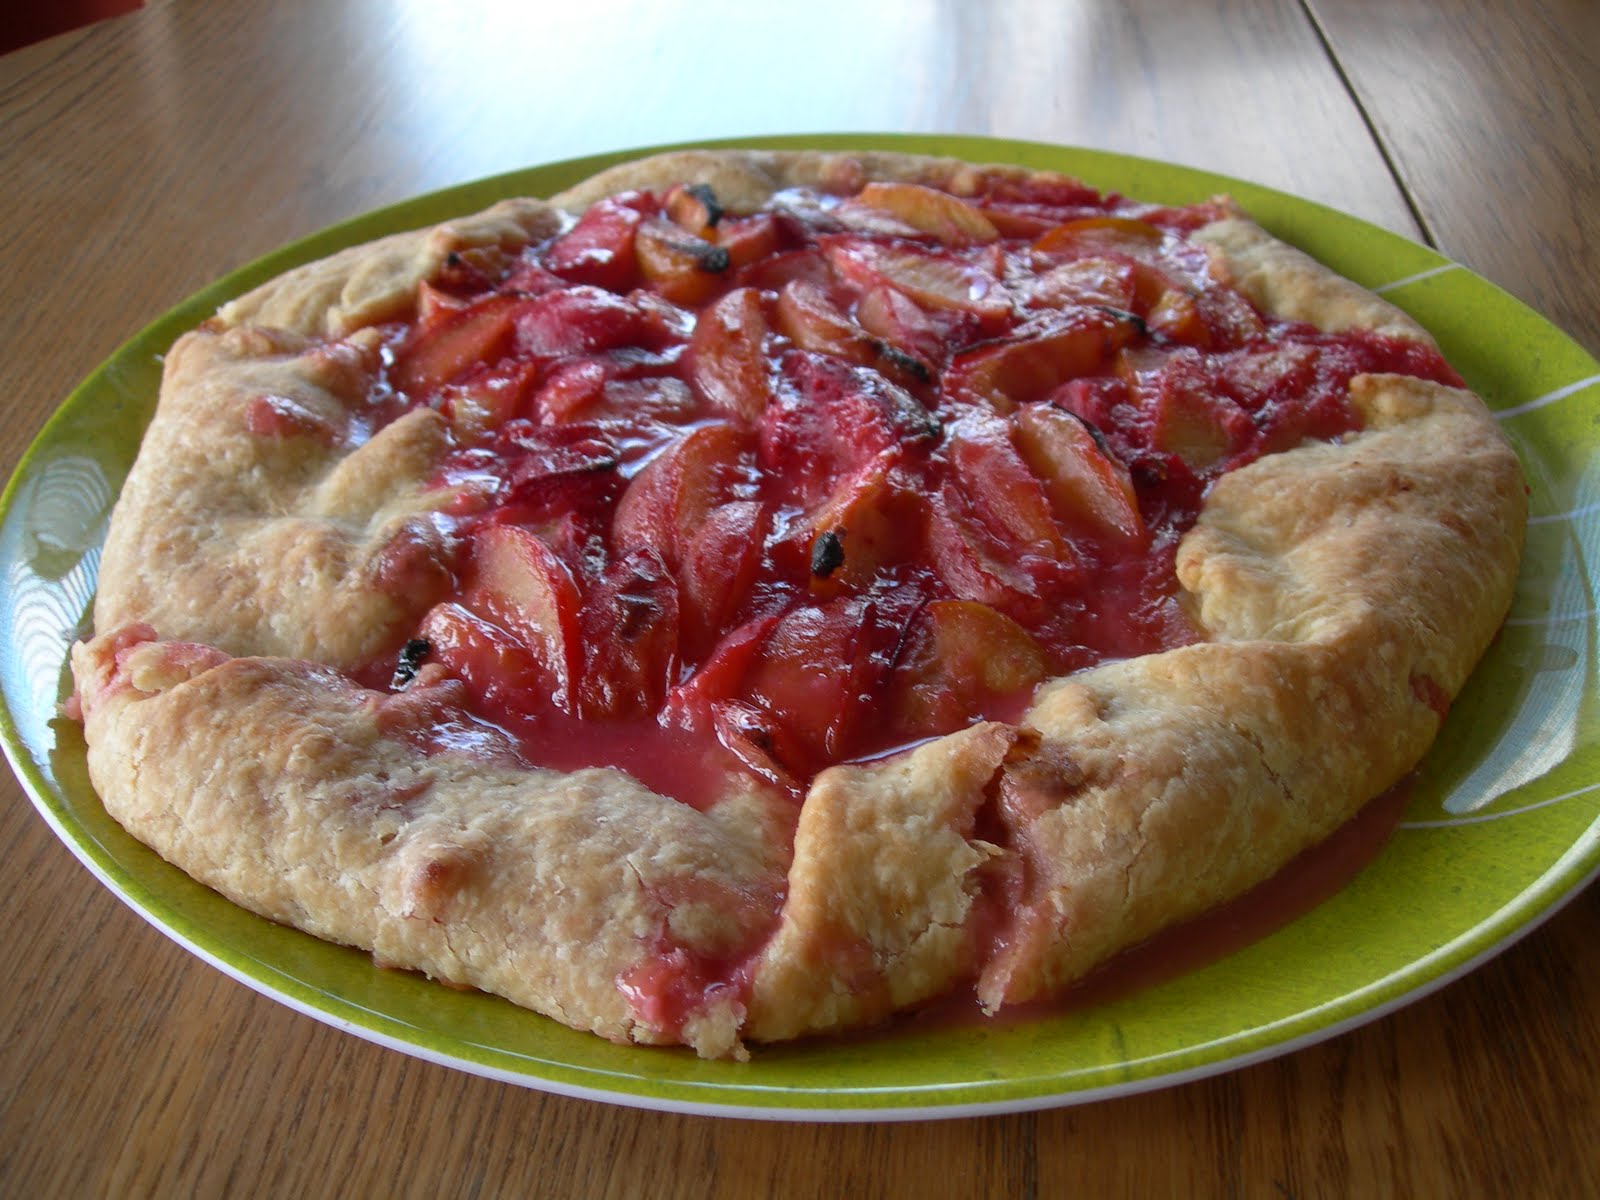
Rustic Tart of Local Plums

I admit to being somewhat beguiled by the word "rustic." I first saw it relating to edibles in a little bistro/pub in Twisp, Washington. "Rustic vegetable tart with cornmeal crust," the menu said.

The word was used to justify having just gathered the pastry up around the filling, rather than rolling it out and putting it in a pan. Well, I'm all for labor saving, and if calling something rustic gives me carte blanche to do so, I say yea!

In fact, the French have legitimized the whole process by calling these casual pies "galettes." And that's fine with me, too.
___________________________________________
RUSTIC TART OF LOCAL PLUMS

I can't remember where I found this recipe, but I've significantly altered it. The original called for sliced almonds to be stirred into the filling, Amaretto cookie crumbs (ridiculously expensive) to be scattered underneath the plums, and the pastry to be brushed with heavy cream and sprinkled with coarse brown sugar before baking. None of that, however, is necessary to produce a superb, memorable and delicious plum tart.

Pastry:
1-1/2 cups all-purpose flour
1 tablespoon sugar
1/2 teaspoon salt

7 tablespoons cold butter, cut into pieces
5 to 6 tablespoons cold water

Filling:
1/2 cup sugar (or less)
3 tablespoons all-purpose flour
1/4 teaspoon freshly ground nutmeg

2-1/2 pounds (about 8 large) not-too-ripe-or-juicy plums or pluots, pitted and cut into eighths
1 tablespoon lemon juice

Assembly:

1 egg, beaten

In food processor, combine flour, sugar and salt; pulse to mix. Add butter and pulse briefly just until coarse crumbs form. Add cold water and process in pulses until a loose ball of pastry forms. Add more water very gradually if necessary; the less you process the pastry, the flakier it will be. Gather pastry into a ball, flatten slightly, wrap in plastic, and refrigerate while you prepare the filling.

In large bowl, mix sugar, flour and nutmeg. Slice plums into a colander set over a plate. You don't want massively juicy plums for this recipe. Save the juicy ones to eat while standing over the kitchen sink!

Heat oven to 425 degrees F.

On a lightly floured board, roll out pastry to a 14-inch round. Gently fold pastry round into quarters and transfer to a baking sheet (with Silpat liner) and unfold the round. Brush the beaten egg in a circle in the center of the round, leaving about a 2-inch egg-free border.

Quickly stir plums into flour mixture, and add lemon juice. Pile plums quickly onto the center of the pastry, in the egged area (the egg seals the pastry and keeps the plum juices from softening the crust), and bring the sides of the pastry up around them.

Bake in middle of oven for 25 minutes, then check. If pastry is getting too brown, cover with aluminum foil. Bake another 15 to 20 minutes. Cool. Slice into 8 pieces and serve with creme fraiche, ice cream, or whipped cream.

Serves 8

Friday, August 6, 2010

Sardinian-Style Raw Tomato Sauce with Pasta


It is appropriate that this, the finest fresh tomato dish in my repertoire, comes from Marcella Hazan, one of the most respected Italian cooks of all time. The discovery of this dish in one of her cookbooks was a sublime moment. Little did I realize at the time that this recipe would for years enrich many a summer evening meal with the sweet, bursting, just-picked-ripe taste of tomatoes and a restrained touch of basil, garlic and Parmesan.

The key to this dish is the tomatoes. They must be perfect. As well, one must refrain from "Americanizing" it; the temptation is to load it with pesto, more olives, more garlic ... but this is a true Italian dish whose tastes need to be experienced intentionally, slowly. It has deep character to be unfolded and discovered, like watching a Merchant-Ivory film, rather than the blatant in-your-face obviousness of a James Cameron film.

But I digress. Do pick up some of the wonderful fresh tomatoes at our local farmers' markets and try this dish.

Tonight, I discovered I only had rigatoni pasta on hand, and it worked fine.

Here's a funny interview conducted with Marcella as she tastes Olive Garden's "Tuscan" fare.
__________________________________________
SARDINIAN-STYLE RAW TOMATO SAUCE WITH PASTA
Adapted from Marcella Cucina by Marcella Hazan

The original recipe called for parsley, not basil, and did not call for crushed red pepper. Tonight I forgot to add the olive oil entirely, and we didn't miss it at all. If you're watching calories, just leave it out!

1-1/2 pounds cherry tomatoes
10 Kalamata olives
3 tablespoons olive oil (optional)
1/2 cup Parmesan or other aged hard cheese, such as Asiago, plus some for sprinkling
1/2 teaspoon minced garlic
1/4 teaspoon crushed red pepper (this will create a noticeable heat)
1 teaspoon salt
A few grinds of black pepper

2 tablespoons fresh basil, sliced

1 pound dried pasta such as fusilli, rotini, farfelle, or penne

Wash and stem cherry tomatoes, and cut in half, or in four wedges if they are large. Put them in a large mixing bowl.

Slice olives into quarters, and add to the tomato mixture along with the olive oil, cheese, garlic, crushed red pepper, salt and black pepper.

Stir the tomato mixture well and let it sit at room temperature for at least 30 minutes and preferably 2 hours.

When ready to serve, cook pasta. Drain pasta and put it into the mixing bowl with the tomato mixture and stir sauce and pasta together.

Stir in the basil. Sprinkle the pasta mixture with a little more cheese, and serve.

Serves six.

Thursday, August 5, 2010

Cold-Brewed Coffee

For a smooth, mellow, almost sweet glass of iced coffee, this is the way to go. When I know I'll be at home for the morning, I try to remember to start some cold brew the night before. Technically you can heat cold brew for a hot cup of coffee, but I prefer it iced.

There are lots of formulas out there, but this is the one I like best.

For serving, the formula calls for mixing your cold-brewed coffee with an equal amount of water. But full strength is darn tasty!

Locally-roasted beans include Buzz Joy, Highpockets, and (well, roasted in Coeur d'Alene) Doma. If you like the taste of a certain coffee bean hot, it will most likely please you cold.
___________________________________________
COLD BREWED COFFEE

You'll need a burr grinder or a skilled touch on a blade grinder, and your favorite coffee beans.

1/3 cup (about two 2-tablespoon coffee scoops of beans) fresh-ground coffee (grind on medium coarse)
1-1/2 cups water

Place ground coffee and water in a jar, stir, put on the lid, and leave either in the fridge or on the counter overnight, about 12 hours.

Strain the liquid through a paper coffee filter into a glass or another jar, and mix half and half with with water or ice to serve. Unless you like it stronger!

Wednesday, July 21, 2010

Summer's Best Greek Salad

When all its ingredients are at the peak of fresh perfection, this salad is to swoon over. I do take it for granted that anyone reading this blog knows what it is to swoon, I mean really swoon, while eating something like this.

The recipe was discovered, I think, in the Tri-City Herald years ago by my Mom, and we have tweaked it through the years to suit our fancies. You can add a dollop of olive oil, but I find the feta provides plenty of smoothness and flavor.

I served this salad with braised natural sausages, fresh corn on the cob, and watermelon. Summer dinner at its finest, brought to you by local farmers!
___________________________________________
SUMMER'S BEST GREEK SALAD

Fresh, fresh ripe tomatoes
Fresh green peppers
Fresh cucumbers
Fresh Walla Walla or other sweet onions

Kalamata olives, whole or halved
Lemon juice
Fresh or dried oregano
Feta cheese, crumbled

Prepare equal amounts of the tomatoes, peppers and cucumbers, cutting them into equally-sized chunks and placing them in a bowl sized suitably for the amount of salad you are making.

Add sweet onion to your taste, either cut into chunks the same size as the other vegetables, or diced finely so they blend in.

Add kalamata olives to your taste, and stir the salad gently. Sprinkle fresh chopped or dried oregano lightly over the salad, and add a dollop of lemon juice. Add as much crumbled feta cheese as suits your taste. Stir gently but thoroughly. The salad keeps very well but is best when made fresh.

Tuesday, June 1, 2010

Spaghetti with Shrimp, Clams and Scallops

A while back I posted about our local Northwest Seafood Market, and last weekend I sought out their fresh clams and shrimp for a special birthday dinner. This recipe is from a lovely, lush cookbook called The Food of Italy, and just looking through it makes you want to rush into the kitchen and start cooking. The book's picture of this dish inspired my friend to comment how delicious and Italian it looked, so it seemed like destiny that she should have it for her birthday dinner!

And so her mother and I had great fun cooking this delectable dish. We made adjustments to the original because we both prefer a generous amount of sauce to a more spartan amount of pasta. As well, we omitted the squid tubes and baby octopus, and upped the quantity of other seafood.

For such an innocent-looking dish, it packs a lot of flavor from the saffron, garlic, and seafood. It's definitely a keeper, and quite suitable for special-occasion dinners!

This amount will serve about 12 people, but the recipe is easily halved.
____________________________________________
SPAGHETTI WITH SHRIMP, CLAMS AND SCALLOPS
Adapted from The Food of Italy

2 cups dry white wine
2 generous pinches of saffron threads

4 pounds clams
2 pounds shrimp, shelled and cleaned
1 pound scallops, cleaned

1-1/2 pounds dry spaghetti

5 tablespoons olive oil
6 garlic cloves, crushed or chopped
1 28-ounce can diced or crushed tomatoes, undrained
1 14-ounce can diced or crushed tomatoes, undrained
1 cup chopped parsley

Lemon wedges to serve

Put the wine and saffron in a bowl and allow to steep.

Clean clams, scrubbing if necessary. Rinse well and discard any that are broken or open and don't close when tapped on counter. Place clams in large pot with 1-1/2 cups water. Cover and turn heat to high, cooking for 2-3 minutes or until all clams open. Remove clams from liquid, and reserve liquid. Remove clams from shells, discarding any that don't open, and set clam meat aside.

Cook the pasta in a large pot of boiling water, timing it to be done when you are ready to mix it with the finished tomato/seafood mixture.

Heat olive oil in large Dutch oven (we used a 12-quart one) and add garlic and both cans of tomatoes, and cook, stirring, for a minute or so. Pour in the saffron-infused wine and the reserved clam liquid. (We only used about a half cup of the clam liquid, but that was just us.) Simmer until liquid is reduced by half. Add the shrimp and cook until all shrimp begin to turn pink, then add the clam meat and scallops, cooking and stirring occasionally until shrimp are thoroughly pink and scallops are opaque.

Stir in the parsley, and add the drained, cooked pasta and gently mix well. Turn out onto very large platter or into a large serving bowl. We dusted the top with grated Parmesan cheese, and very pretty it was. Garnish with lemon wedges or serve them separately.

Monday, April 19, 2010

Asparagus, Tarragon and Chive Quinoa


Today's e-mail from the farmer saying ANOTHER bonus box was coming tomorrow with TEN POUNDS of asparagus in it was all it took to send me scurrying to the fridge to gather up all the asparagus I had left from the other boxes. Trimmed, it was almost exactly a pound, and the chives and tarragon in the garden have been producing nicely, so I doctored up this dish to accommodate them.

The chive blossoms, which are an advantage of having a clump of chives in your garden, dressed up this dish but aren't required!
__________________________________________
ASPARAGUS, TARRAGON AND CHIVE QUINOA
Adapted from 101 Cookbooks, originally from the book My Favorite Ingredients by Skye Gyngell

1 pound trimmed CSA asparagus
olive oil

2 cups dry quinoa, well rinsed and drained (Costco sells huge bags of organic quinoa)
1/2 teaspoon salt

Dressing:
1/4 cup butter, softened
1/4 cup olive oil
2 teaspoons Dijon mustard
1 tablespoon lemon juice
1 teaspoon (or to taste) Tabasco or other hot pepper sauce
1/4 teaspoon salt

1/3 cup fresh chives, chopped
1/3 cup fresh tarragon, chopped
Chive blossoms if you have 'em

About 1/4 cup toasted and chopped almonds

Put quinoa, 1/2 teaspoon salt, and 3 cups water into a medium-size pot and bring to a boil. Reduce heat and simmer, covered, for about 15 minutes or until little curls that look like sprouts start forming on the grains. Remove from heat. If there's still water left, drain off as best you can and let the quinoa sit, covered, to soak up the little water you couldn't get out.

Cut the trimmed asparagus into 1-inch segments and saute them in a splash of olive oil in a large skillet for about 10 minutes. Add a little water and cover to cook for just a few minutes or until tender-crisp. Watch carefully; you want to asparagus to stay bright green. When it's ready, remove from heat and set aside.

Whisk the dressing ingredients in a small bowl 'til smooth. Taste for heat and spiciness! This will vary tremendously depending on what chili sauce you use. This dish can take a lot, but do monitor and adjust at this point.

Toss the asparagus pieces into the quinoa pot and mix. Stir in the chives and tarragon. Pour the dressing over, stir well, and pile the mixture into a serving bowl. Top with the almonds and chive blossoms and serve warm or at room temperature.

Serves 6-8.

Friday, April 9, 2010

Spring Chicken Pot Pie


Not your typical wintery chicken pot pie ... this one welcomes the new green tarragon awakening in the garden ... green onions ... fennel ... asparagus ... all gathered together for an unexpectedly fresh taste. As I write this, rain is lashing the window in a sudden afternoon of wind and gray gloom blowing through ... but I can see blue sky right behind it.

I really don't know why dishes with crusts are showing up so often here ... but I don't think it's something that needs to be analyzed.

As always, substitute confidently and enjoy this pie, however you make it. The original called for a diced tomato and some peas. I seriously altered the original version to suit my Spring fancy, but don't think the venerable Sheila Lukins would mind. She would understand the need to realign ourselves culinarily with both the calendar and the barometer.

Update: This dish is sheer ambrosia; very satisfying but suitable for light evenings, blooming lilacs, and chirpy birdsong. Do try it.
_____________________________________________
SPRING CHICKEN POT PIE
Adapted from a recipe in Parade Magazine by Sheila Lukins

1 tablespoon olive oil
1 tablespoon butter or ghee

1 medium fennel bulb, tops and leaves removed, sliced thinly (about 1 cup)
3 tablespoons flour

3 cups homemade local, free-range chicken broth
1 bunch green onions, white and green parts, cut in 1/2-inch slices
1-1/2 cups carrots, diced or sliced
1 cup diced CSA potatoes (1/2-inch dice)
1 apple, cored and cut into 1/2-inch dice
1/4 cup chopped fresh dill or 2 teaspoons dried
1/2 teaspoon salt

2-1/2 cups cooked local, free-range chicken, deboned and cut up or diced
1 cup CSA asparagus, thick ends snapped off, cut in 1/2-inch slices

1/4 cup fresh tarragon, chopped, or 2 teaspoons dried
2 cloves garlic, minced

Salt and pepper to taste

1 sheet puff pastry (1/2 pound) or your own coconut oil pastry using half the recipe from this post, or other homemade pastry. Or make biscuits and place cut dough on top of the pie ... or dot cornbread batter on it .. or ... you get the picture.

1 egg mixed with 1 tablespoon water for egg wash (I skipped it)

Heat oil and butter in large pot over low heat. Add fennel and cook for 5 minutes, stirring occasionally. Sprinkle on flour, and cook stirring constantly for one minute.

Add broth, green onions, carrots, potatoes, apple, dill and salt; bring to boil. Reduce heat to gentle simmer and cook, partially covered, until vegetables are tender, about 20 minutes, stirring often.

Add chicken and asparagus, season to taste with salt and pepper, then cook 5 minutes more. Stir in garlic and tarragon, and add a few grinds of black pepper.

Preheat oven to 350 degrees. Spoon chicken mixture into 2- or 3-quart round ovenproof casserole. Roll pastry out and trim to or just larger than your casserole diameter. Lay pastry over chicken mixture and either crimp edge or tuck under all around. Slit top so steam can escape, and brush pastry with egg wash if you wish.

Bake until crust is golden, 30 to 40 minutes.

Makes 4 very hearty servings.

Friday, March 26, 2010

Warm Balsamic Bean and Spinach Salad

To my delight, I discovered the bag of CSA spinach from last week hiding in the back of the fridge. It was as fresh and beautiful as if it had just been picked. The Coconut-Cashew Greens from Moosewood Celebrates came to mind, but then I discovered a recipe for warm bean salad with balsamic vinegar and bacon--two things that go splendidly with spinach. I am not above muscling a major ingredient into an existing recipe! A few other alterations resulted in a quite delicious main dish.

If using bacon or garlic in a dish, I like to add them near the end of cooking so the bacon has more texture and the garlic retains its fresh flavor.

I served this salad as an entree, but the recipe would work well as an accompaniment to meats if you left out the beans and upped the quantity of onion and spinach. The bay leaf adds an interesting layer of flavor under the balsamic and bacon.

Update: Despite the unassuming nature of this dish's appearance, it is very good. Second-helping-by-husband good. And leftover-for-lunch-the-next-day good. Too good not to add this update!
__________________________________________
WARM BALSAMIC BEAN AND SPINACH SALAD
Adapted from A New Way to Cook by Sally Schneider


4 slices (about 2 ounces) natural bacon
2 cloves garlic

1 large CSA onion, halved and sliced thinly
1/2 teaspoon crushed red pepper
3/4 teaspoon coarse salt
A few generous grinds of black pepper

12 ounces or so CSA spinach leaves, washed, with large stems removed

1/3 cup balsamic vinegar
2 bay leaves

3 cups cooked beans (I used the CSA nine-bean mix I cooked and froze earlier)

Peel and chop the garlic finely. Place in small dish. In large skillet, fry bacon pieces until crisp. Remove to bacon pieces to small dish with the garlic.

To same skillet, add onion, crushed red pepper, salt, and black pepper. Saute onions for about 10 minutes or until they soften and start to turn golden.

Add spinach, stir well, and cover. Cook for five minutes or so, stirring occasionally, until spinach is wilted.

Add balsamic vinegar, 3 tablespoons water, bay leaves, and beans. Stir, and cover. Simmer for 10 minutes, stirring occasionally.

Stir in bacon and garlic and heat through.

Makes four generous servings.

Sunday, February 14, 2010

Leek, Pear and Goat Cheese Tart


Ever since making Onion, Apple and Goat Cheese Tart, the variation with leeks and pears has been on my mind. It is just as good as the apple/onion version. If forced to choose which is better, I honestly could not. They're both wonderful.
_________________________________________
LEEK, PEAR AND GOAT CHEESE TART

This recipe with the following replacements:

2 slightly underripe Bosc pears, for the apples
2 large or 4 medium leeks, white and light green parts only, sliced 1/4-inch thick, for the onion (about 4 cups raw sliced leeks)
Increase thyme from 1 teaspoon to 2 teaspoons

Tuesday, January 19, 2010

Winter Vegetable Pie


We could not believe how delicious this dish is. It is soul-warming and deeply satisfying. The combination of vegetables and flavors, with the flaky, slightly sweet crust, is ethereal. Once you get the vegetables all ready, it goes together pretty quickly.

The British are famous for their drab cuisine, but I always find intriguing and delicious recipes in the British magazines I pick up now and then at Barnes & Noble. The recipes are always straightforward and robust, often showcase seasonal produce, sometimes carry a hint of ancient ancestry (Norse?), an aura of mystery (Celtic?), and a dash of the Eastern exotic, like this recipe's cilantro and saffron.

The one annoyance of these British recipes is their use of milliliters, grams and such. I have gone to great lengths to translate these awkward measurements so that you can produce a tasty result with no hair-pulling!
___________________________________________________
WINTER VEGETABLE PIE
Adapted from British Country Homes

1 small cauliflower, separated into florets
1 medium rutabaga, peeled and cut into half-inch dice (original called for parsnips)
1 medium sweet potato (about 1 pound), peeled and cut into half-inch dice (or butternut squash)
3 cups vegetable broth (I used Pacific organic)
1 teaspoon saffron strands

4 tablespoons olive oil

8 ounces brown mushrooms, sliced

3 (yes, three!) red CSA onions, peeled and diced
2 teaspoons cumin seeds, lightly toasted in a dry skillet and crushed
1/2 teaspoon crushed red pepper flakes
2 tablespoons flour
5 tablespoons chopped cilantro

Salt and freshly-ground pepper

Pastry crust (recipe below)

In large frying pan or pot, place cauliflower, rutabaga and sweet potato, and add stock. Bring to boil and then reduce heat and simmer until vegetables are soft to pierce but not mushy. Remove to a 4-quart casserole dish, reserving stock. Pour stock into a small bowl and stir the saffron into it. Set aside.

Heat 2 tablespoons olive oil in the pot and saute the mushrooms 'til lightly browned, sprinkling with salt and freshly-ground pepper. Remove to casserole dish with vegetables.

Heat 2 more tablespoons olive oil in pot and saute the red onions with the cumin and crushed red pepper until onions are soft, about 10 minutes. Shake a little salt over the onions, and grind some pepper over them. Sprinkle the flour onto the onions and stir, then pour in the saffron liquid, stirring and cooking for a minute or two until thickened. Stir in the cilantro.

Add to vegetables in casserole and mix gently. Carefully place the rolled-out crust over the vegetables, either tucking edges under, or crimping them along the edge of the dish. Cut some vent slashes in the crust, and if you wish, brush with beaten egg for a golden, shiny effect. If you have leftover dough, you can cut some shapes to decorate the top of the pie.

Bake at 375 degrees for about 30 to 45 minutes, or until crust is golden and baked through.

PASTRY CRUST
Adapted from several I found online. The pie's original crust recipe used standard butter pastry.

3/4 cup regular flour
1/2 cup whole wheat flour
1/2 teaspoon baking powder
1 teaspoon sucanat or sugar
1/4 teaspoon salt, heaping a bit
6 tablespoons cold butter OR coconut oil (if using coconut oil, measured it out at room temperature)
1 teaspoon cider vinegar
3-5 tablespoons ice water

In small bowl, mix all dry ingredients well. Cut in the butter or coconut oil with a pastry blender 'til shortening is in pieces no larger than peas, then add the water a tablespoon at a time, with the vinegar, mixing with a fork until dough holds together like traditional pastry dough. Gather into a ball, smooth, and roll out on floured board to the shape of your casserole.

Monday, January 11, 2010

Roasted Garlic Hummus

It's tempting to think that something this simple and ordinary (hummus, for heaven's sake!) would taste simple and ordinary, too. But it does not. I'd been making hummus for years with raw garlic, but it wasn't until tasting my friend Stephanie's hummus made with roasted garlic that I realized the profound difference in flavor roasting the garlic makes.

Our local Slow Food convivium held a potluck here last night with the theme "Comfort Food," and I was assigned an appetizer. So, roasted garlic hummus, made with my CSA chickpeas, it was.

Pita chips are the expected accompaniment to hummus, but all manner of crackers and vegetables alongside are equally wonderful.

You may want to double or even triple this recipe. Hummus tends to evaporate quickly!
__________________________________________
ROASTED GARLIC HUMMUS
Adapted from Eating Well magazine

1 head garlic
2 cups cooked CSA chickpeas
2 tablespoons lemon juice
2 teaspoons soy sauce
1 tablespoon olive oil
1 tablespoon tahini (sesame paste)
2 tablespoons water
Salt to taste (I used 1/2 teaspoon)
Chopped parsley for garnish

Heat oven to 425 degrees. Slice the top 1/4-inch or so off the top of the garlic head; don't separate the cloves. Wrap in a small square of foil and roast about 30 minutes or until the garlic is very soft. This process makes your kitchen smell wonderful.

Let the garlic cool enough to handle, then turn the head on its side and place a spatula vertically on the head, just above the roots. Hold the garlic in place and press the spatula down firmly, drawing it toward the top of the garlic as you press out the roasted garlic from inside the cloves.

In food processor, combine roasted garlic, chickpeas, lemon juice, soy sauce, olive oil, tahini, water and salt. Puree until the hummus reaches the texture you like. It's good smooth, but is also interesting and tasty if it's a little grainy. Serve sprinkled with chopped parsley and drizzled with a little olive oil.