Friday, September 23, 2011

Cajun-Portuguese Fusion: Bouillon Verde

 
The Autumnal Equinox is here, so ...it's soup time!  I'm pretty sure Soup Peddler David Ansel titled his hilarious and fun-to-read cookbook Slow and Difficult Soups in response to the overused "Quick and Easy" that dozens of cookbooks seem to use these days.  Most of David's soups, though, actually are quite simple and speedy to prepare. 

Every year about this time I start thinking about Caldo Verde, a Portuguese soup made with linguica sausage and kale.  That's why I picked up a package of AmyLu's andouille sausage at Costco the other day.

Yes, I know  andouille is Cajun, but Costco didn't have linguica.  Come to find out, I didn't have enough of my delectable Schreiber and Sons kale, either, so I subbed in some of their Brussels sprouts.  Then I decided to add carrots, and some smoked paprika.  Really, it became rather a soup free-for-all, which, I am happy to report, turned out splendidly.

So, herewith my Cajun-Portugese fusion soup.  Caldo Verde is Spanish for green broth, which in French is bouillon vert, so we're calling this Bouillon Verde.  Fair enough?

BOUILLON VERDE
Adapted from The Soup Peddler's Slow and Difficult Soups by David Ansel

The book calls for browning the sausages first, then sauteeing the veggies in the fat in the pan.  My sausage was, unfortunately, rather low fat, so I couldn't do that.  But if you have fatty sausage, browning it first is the way to go!

3 tablespoons ghee, butter or olive oil

2 onions, quartered and sliced into crescents
1/2 bunch kale, thick stems removed, leaves chopped
2 cups trimmed Brussels sprouts, coarsely chopped

8 andouille sausages, cut in about 1-1/2 pieces, at an angle for jauntiness
1 tablespoon smoked paprika
1/8 teaspoon crushed red pepper
a few grinds of black pepper

2 quarts chicken broth or stock

2 or 3 potatoes, peeled (or just well scrubbed, if they're organic), cut into 3/4-inch dice
6 fat carrots, peeled, cut in half lengthwise, and then into 3/4-inch dice.

1 head garlic (about 8 fat cloves), peeled and coarsely chopped

Salt as needed

Start off by heating the ghee in at least a 6-quart soup pot over medium heat.  Add the onions, kale and Brussels sprouts as you prepare them, stirring occasionally.  The veggies should begin to soften and perhaps even brown a bit.

Add the sausage pieces and stir, then stir in the paprika, crushed red pepper and black pepper, and cook a few more minutes.

Add the broth, potatoes and carrots, and half the garlic, and bring to a simmer.  Cook for 15 minutes or so, then stir in the remaining garlic.

Cook 5 to 10 more minutes, or until the potatoes and carrots are tender. Taste for salt; whether to add any or not depends on the broth you use.  I added 3/4 teaspoon and found it to be just right.

Makes about 8 servings

Costco is now selling this organic chicken "stock" as opposed to the "broth they formerly offered.  The label says "More versatile than broth."  My opinion?  The stock is exactly the same as the former "broth." 

Don't be afraid to buy these lovely branches of Brussels sprouts at Schreiber and Sons' booth at the farmers' markets.  The sprouts pop off by hand quite easily.  Just snap and twist.

Wednesday, September 7, 2011

The Ritual Nectarine


You know how it is ... well, maybe I'm unique, but I doubt it.

Glorious weather.  A spectacular hike experience.  Sweltering and thirsty, you reach the hike midpoint, and pull up to the nearest log or rock to rest a spell and enjoy a magnificent view (which you have EARNED!).

You rummage around in your pack for that ripe-to-perfection Gilmore Farms nectarine you have wrapped carefully in a paper towel.  One sweet, juicy, flavorful bite later, and you know that this is an experience you will never forget:  endorphins high from being outdoors and hiking, nourishment and hydration flowing into you from one of the tastiest, juiciest fruits known to man.  You want to have this experience again and again.

That happened to me several years ago on the hike to Upper Crystal Lake from Chinook Pass, and because we take this hike every year, I've made sure to repeat this ambrosial experience each time by packing a Gilmore Farms nectarine to look forward to. These photos are from this year's hike on September 4.

This hike is spectacular and perfect in every way.  There are open hillsides, rocky shale, shady forests, cool lakeside resting spots, several great viewpoints, a high pass, flower-filled glades, and finally, views of Mount Rainier above Upper Crystal Lake.

Looking back at Chinook Pass from the trail.

Sheep Lake lunch stop.  Sourdough Gap is in the indention in the center of the photo, in the mountain ridge.

A sampling of the flowery glades we passed by.

Tiger lilies ... a rare sight.  They're native to Washington State (a knowledgeable-looking hiker told me) and don't bloom for very long.

And finally:  The Nectarine View

Logistics:  Link to a map here.  We like to start the hike by parking at Tipsoo Lake, just inside the (no-fee) entrance to Mount Rainier National Park.  There are restrooms.  Follow the trail shown on the map to Sheep Lake.  There's another trail up to Sourdough Gap, through which you can proceed, taking the left-hand trail at the fork, to a small ridge, passing over which you will see Upper Crystal Lake and Mount Rainier.

And don't forget to pick up your Gilmore Farms nectarine (they're at Pasco, Richland and Kennewick Farmers' markets) before leaving home!

Friday, August 26, 2011

The Surprisingly Easy Watermelon Basket


Tonight we were invited to a gathering with no name or theme, or even an expressed purpose (hanging out with great people was implied).  There would be food.  We could bring something if we wanted.  Well!  With such nonexistent guidelines, I didn't know which way to turn.  So I asked my group of friends last night at our Gals' Dinner Out what to do ... I was thinking about melons.  Jeanne said, "Why not make a melon basket!  It's easy!" 

I laughed.  Ha!  I could just see the hash I'd make hacking around on a juicy melon, not to mention the low likelihood of ending up with something worthy of taking where Other People would actually see it.

But once again, as has been the case so many times (and I've blogged about many of them), I was entirely wrong.  I tried it.  And it worked. 

May you all be so blessed with friends who have faith in you, and with the courage to do something outside your culinary comfort zone.

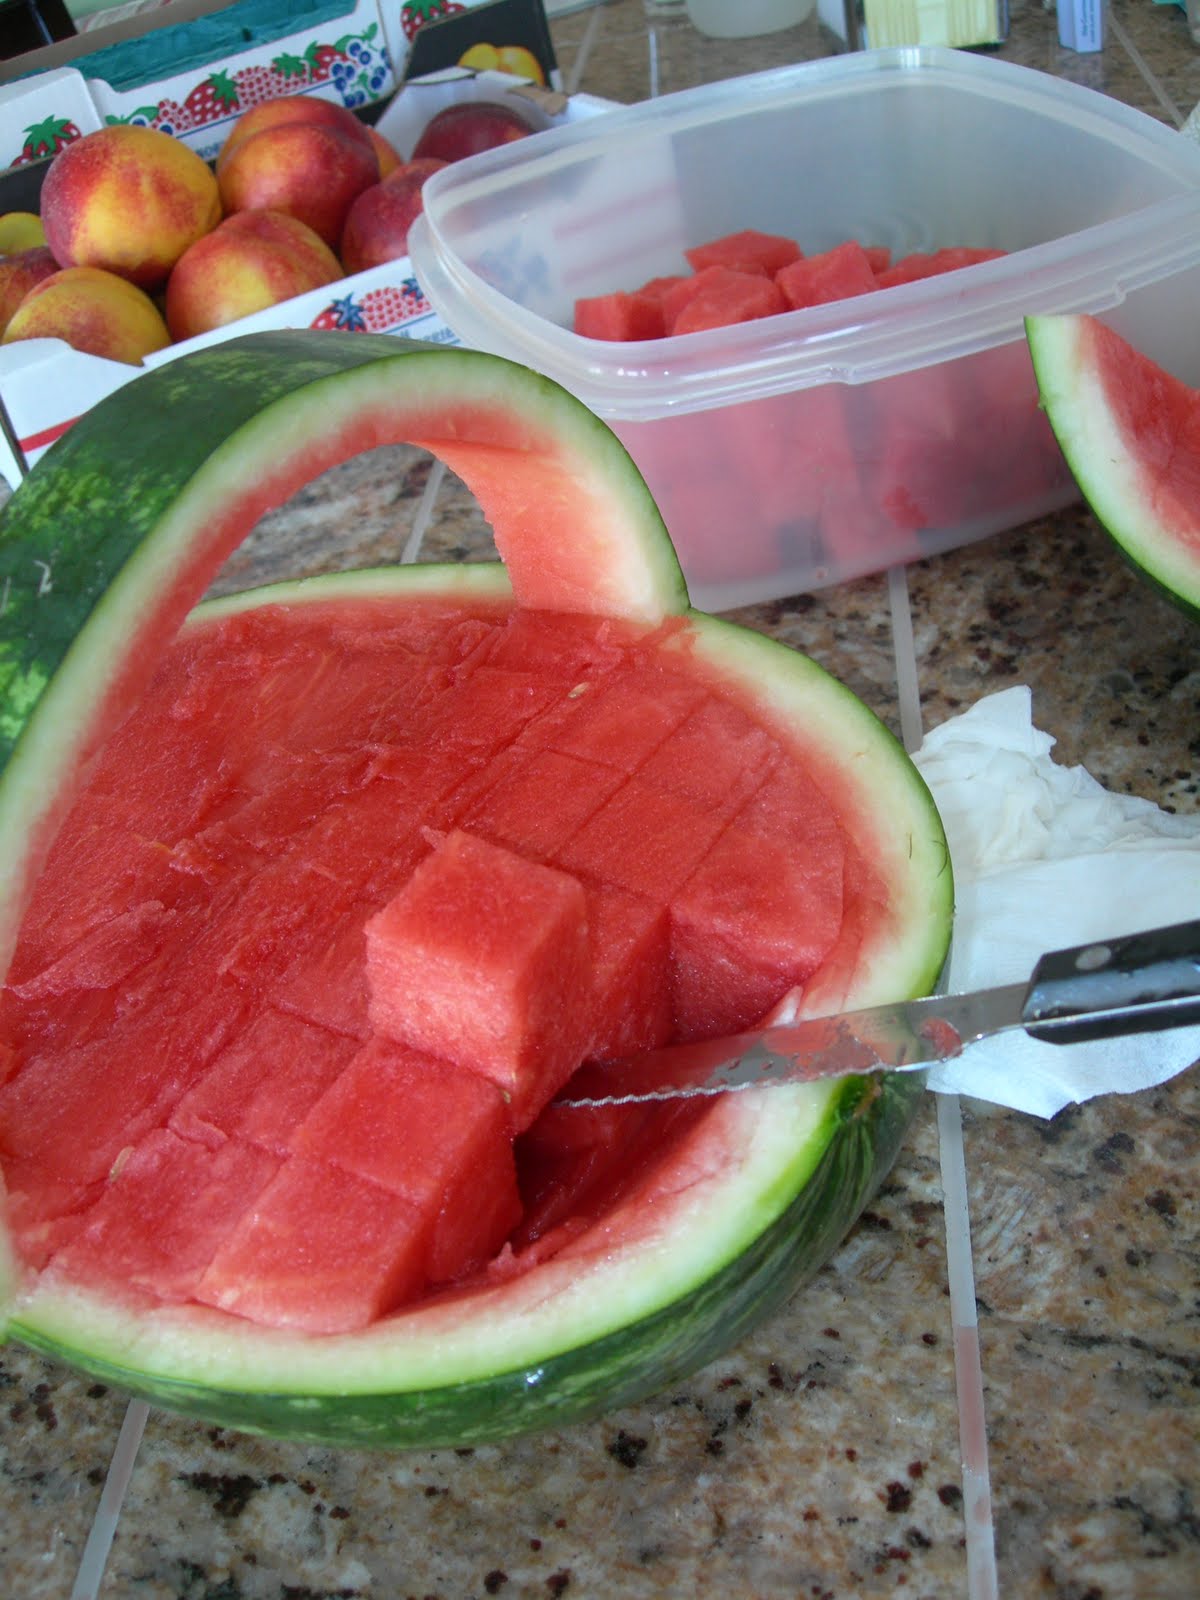
This was instinctive.  To keep the melon from tipping, I sliced a bit off the side to keep it stable.


With the knife point, I scored a line around the long equator so I'd know where to stop when slicing the basket handle.  I also lightly scored, on the top, the desired width of the basket handle so I'd know where to cut.


Now we're cookin'.  I got a container ready for the melon squares.  (Yes, that is a box of Gilmore Farms organic nectarines in the background.  They are awesome!  See Gilmore Farms at our local farmers' markets.  The melon is from Sageland Farms in Pasco.)

With a smaller, slimmer knife, I cut the arch of melon out from under the basket handle, and started making cubes of the pieces as I cut them out.

Cutting down into the bowl of the melon.  This is a little tricky because of the curves.  So I started saving the nicest-looking, most even cubes separately for the finished presentation.


An ice cream scoop worked great for cleaning out the melon bowl.  After that, it was just fill (least perfect pieces underneath, saved perfect cubes for the top), chill, and go!

Saturday, July 30, 2011

Savoy Faire Slaw


You'd think the plethora of amazingly fresh local vegetables in summer, available at our area's FIVE weekly farmer's markets, would result in an endless cascade of posts on this, my local food blog.  Ironically, though, the big push every day to use up the produce with which I've stuffed my fridge results in some hectic cooking, with little time left for blogging about it.

As well, long summer evenings don't lend themselves to sitting at a computer, but rather to being outdoors enjoying our balmy Tri-Cities weather and gorgeous sunsets!   But I have a few things in the blog pipeline that are good enough to publish.

How could anyone not be inspired by this gorgeous local organic Savoy cabbage?  I paired it with a creamy chive dressing found in one of my favorite cookbooks.
_______________________________
SAVOY FAIRE SLAW
Dressing inspired by Patricia Wells in Vegetable Harvest.

Savoir-faire is the French expression for "know how to do."  You'll know just what to do with this slaw!

1 smallish head savoy cabbage

1/2 cup cream
1 tablespoon snipped chives
1 tablespoon lemon juice
1/4 teaspoon salt

Trim core from cabbage.  Slice cabbage very thinly, then slice crosswise a few times so you have pieces about an inch long.

Whisk dressing ingredients in medium bowl.  Add cabbage and mix well.  Slaw will keep well but tastes fantastic freshly made. 

Makes 4 servings

Monday, July 11, 2011

Undeservedly Good Shrimp Curry

Sometimes you want lip smackin' food with the minimum of effort.  By "minimum," I mean practically no effort at all.  Not just cutting corners, but eliminating them entirely.

To that end, I frequently employ some seriously slap-happy cooking practices that just possibly could get me banned from the food blogosphere.  To be honest, the results aren't always blogworthy. 

But this scrumptious dish calls for a little peek into the slam-dunk, get 'er done methods you can use to produce meals when you really don't feel like cooking.  And when you didn't thaw anything ahead of time.  When it absolutely, positively has to be on the table by six o'clock, and you started cooking at 5:45. 

_________________________________
UNDESERVEDLY GOOD SHRIMP CURRY

Adapted from tasting the Valley Cafe's Spicy Asian Shrimp from our last visit there.  You can use a 14-ounce can of coconut milk instead of the water and coconut cream, if you like.

25 tail-on (or tail-off ... your call) shrimp, frozen
1/2 cup chopped sundried tomatoes, in oil (I used Costco's, even though they have Italian spices!)
A few slabs (about 1/2 cup's worth) of coconut cream (see end of this post)
1 to 2 teaspoons red Thai curry paste
1/4 teaspoon (or more to taste) crushed red pepper
1 teaspoon salt
A few grinds black pepper
2 cups water
Green onions (or chives)
Fresh basil or mint (Mint was growing in a pot on the patio, so I used that)
Chopped fresh tomato, if you have it

Quickly rinse the frozen shrimp, pluck them from the rinse water, and lay them in a single layer in a medium skillet.  Top with the sundried tomatoes, and arrange your coconut cream slabs around atop all.  Add the curry paste, crushed red pepper, salt, black pepper and 2 cups water.

Turn heat on to medium high, and when things start to bubble a bit, stir everything around.  Reduce heat a tad, but make sure it keeps simmering.  The shrimp will begin to turn pink.  Stir occasionally, and when shrimp are done, remove them with a slotted spoon to your serving dish.

Continue simmering the sauce until it's reduced about a third.  If you used a can of coconut milk, reducing probably won't be necessary.  Pour sauce over the shrimp, top with green onion (or chives), diced tomato, and basil or mint.

Makes 2 very hearty servings. 

Wednesday, June 15, 2011

Valley Cafe Vegetables

Some of you who grew up in the age of strip malls, Applebees and P.F. Changs will not remember when most restaurants had narrow street fronts and were long and thin, stretching through to a back alley. The Valley Cafe in Ellensburg continues this grand tradition of narrowness, but this venerable establishment had foresighted designers, and is blessed with a row of ancient skylights to alleviate the inevitable darkness of this building design.  The experience of walking back in time is very strong at The Valley Cafe, especially as the booths, counter, and most of the furnishings are original.

Ellensburg makes a great day trip from Pasco.  The day we were there was chilly and windy, but sunny, and we were glad to get in out of the jacket-piercing breeze to see what we could find on The Valley Cafe's menu that would be friendly with our way of eating.

We decided on the Steamed Vegetables and a separate order of Spicy Asian Shrimp.  After we ordered, I asked the server if any bread was involved in this meal.  We're getting used to heading bread off at the pass so it won't be wasted.  She hesitated a moment, but said "No."

It took quite a while for our order to be prepared, and when the vegetables arrived, they were a delightfully colorful and flavorful mix of vegetables I'd never seen combined before.  As well, they were topped with a little cheddar-jack cheese and toasted pumpkin seeds, something I'd also never considered doing to vegetables.  Naturally, I took notes.

As it happened, the chef himself brought the rest of our order to the table, and I told him how remarkably tasty the vegetables were, and how unusual was the combination.  He said, "Well, you didn't want broccoli, so I just put together some other vegetables."  Turns out, the server thought I'd asked if any broccoli were involved in our meal, thinking we didn't want it!

I never fail to be intrigued by the happenstances that result in new dishes.  This one is a new favorite of ours, and it goes particularly well with the cafe's Spicy Asian Shrimp, so I concocted an easy-peasey version of that, too, and it'll be up next.
_____________________________________
VALLEY CAFE VEGETABLES
Cook gently so your vegetables will retain their color and flavor.  

2 tablespoons ghee or butter

4 carrots, peeled and cut into coins
1/2 pound asparagus, snapped and cut into 1-inch lengths
1/3 of a small red cabbage, cut into 1-inch pieces
1 red pepper, seeded and cut into 1-inch pieces
1 jar (6.5 ounces) marinated (or plain) artichoke hearts


Pumpkins seeds lightly toasted in a dry skillet
Shredded jack or cheddar cheese (optional, of course)

In large skillet, melt ghee.  Add carrots and stir fry for a couple of minutes.  Add asparagus and cabbage, and continue cooking until all is just beginning to soften.  Add red pepper pieces, and cook, gently stirring occasionally, until all vegetables are crisp tender.  Don't overcook.

Remove to serving platter or individual plates, and tuck artichoke pieces here and there evenly.  Sprinkle with cheese and pepitas.

Makes 4 generous servings.

Tuesday, May 31, 2011

Heidi Swanson's Spiced Coconut Spinach

Things are slightly hectic around here lately, but my mind continually returns to the kitchen, especially as the farmers' market season gets underway.  Several ideas are circling in my mind about refining, nay, reinventing, my way of cooking.  I'm excited about sharing some ideas and approaches I've been discovering.

I am usually a slap-it-together-and-see-what-happens kind of cook.  Once in a while I carefully create a constructed dish, but I've often wished I could be a slow-down-and-think-about-it, mindful, kind of cook more consistently.

Meanwhile, I tried this recipe by Heidi Swanson of 101 Cookbooks, who somehow manages to be mindful, deliberate, and spontaneously creative with ingredients on hand ... all at the same time. 

I had what turned out to be 14 ounces of fresh spinach from the very first Pasco Farmer's Market of the year, and so doubled Heidi's recipe, which made four hearty servings.  Having no shallots, I used onion in their place.

I highly recommend this dish.  It's very calming to toast the mustard seeds, cumin and coconut.  The scents and subtle colors appeal to the senses.  You have an awareness that you are doing something to spinach that will be very, very good.   Preparing the ingredients all ahead of time creates a sort of serene kitchen ballet as the dish unfolds in real time, and really, not so much more time than slapdashery would take.

An early Spring dish that nourishes on all levels.


Thursday, May 19, 2011

Kohlrabi Greens

The sweetest, crispiest organic kohlrabi can be found at Fred Meyer these days.  I'm hoping to see it at the farmer's markets this year.

In the meantime, we've been enjoying it raw, peeled and sliced, sometimes as a great chip stand-in with guacamole.  It can also be shredded and used in salads, adding an interesting, fresh flavor kind of like a cross between cabbage, turnips and broccoli.

Normally, I discard the leaves and store the Sputnik bulbs in the fridge 'til ready to use them.  But the last couple of bunches had leaves that looked perfectly fresh and tantalizing, so I washed them, sliced them, and have been cooking with them ... and they are wonderful! 

Kohlrabi greens are closest to kale when it comes to cooking time ... they're not as tender as beet greens, but are more tender than collards, which need to boil for an hour.  Just wash the leaves, rip out the thicker parts of the stem, slice the leaves thinly, and saute for 10 to 15 minutes with onions, garlic, crushed red pepper ... or even apples or tomatoes and herbs.  Voila!  A new green!

Friday, May 13, 2011

What to do with Coconut Butter

Healthy fats like coconut oil beat sugar and flour every time for clean, sustained energy and a happy metabolism. 

So, in the midst of the Easter onslaught of factory-churned-out chocs and candies with additives galore, I just got out my beautiful marble Easter eggs for color, and made Nancy's coconut-date energy balls.

These are really, really, good, plus, as you can see from Nancy's description, they have all kinds of positive health implications.  I increased the organic citrus peels to two teaspoons each, which gives these little citruspheres a powerful resemblance in taste to those horribly unhealthy lemon bars which we all remember fondly for their ability to make our teeth hurt.  We should have listened to our teeth!  Our bodies didn't want that much pure refined sugar.  Nancy kept going on her theme and developed raw cacao superfood truffles, which look tempting to me to try.

As often happens, finally having found a recipe that used the coconut butter I'd bought on impulse, another way to use this luscious stuff appeared.  Ryan's coconut cream and blueberry bark is incredibly delicious.

As with the citrus balls, you soften the jar of coconut butter (or coconut cream) in a pan of warm water on the stove, pour it out (I used a Silpat; Ryan used parchment paper) and slap frozen blueberries evenly across the top.  The frozen blueberries solidify the coconut butter.  Just break the bark into bite-sized pieces (this is important, because chomping into a big piece may cause a blueberry laundry crisis) and store 'em in the fridge.

Many thanks to Nancy and Ryan for adding variety to my energy arsenal!

More ideas for making coconut bark here.

Update:   Here's a seriously convenient way to keep coconut cream and coconut butter accessible.  If you've ever tried to dig 'em out of the jar with a pointy knife, you know what I mean.  Warm the coconut cream or coconut butter in the uncovered jar set in a pan of water on the stove.  May take 15 minutes or so at a simmer.  Stir occasionally.  When soft, spread coconut cream or coconut butter onto a Silpat.  Let harden, and either cut or break into roughly tablespoon-sized pieces.  Store them in a jar or other container.  For coconut cream, one tablespoon heated with 1/4 cup water makes 1/4 cup.  Stir a piece or two into curries, with a little water, or into sauteed veggies with Asian seasonings.  For the coconut butter ... you can either resoften with your preferred warming method, or just enjoy it as a snack.
Coconut cream pieces ready to reconstitute ... or just eat!

Monday, May 9, 2011

On Not Eating Certain Scenery

Last April we were cleaning up flower pots in preparation for new planting, when a mama quail, completely camoflaged, whirred out of this pot when we approached it.  We carefully inspected the pot, and sure enough ... we found a nest with 18 little speckled eggs in it.  Mama came back later, and I took this picture of her.  Yes, she is there ... at about 12 o'clock.

The next day, she temporarily left the nest, and I quickly took this picture of the eggs.

I had seen a quail couple, with the mama waddling about and looking really round, exploring our yard for a nest site a couple of days before.  We learned that quail eggs take 28 days to mature.  Sure enough, about that much time went by (with us tiptoeing around the flowerpot every time we went outside to work in the yard) when we noticed that hatching had begun.

The hatching was quickly over, and the quail parents set immediately to their task of teaching the little ones how to queue up, hide in a cluster under mama's wings, and keep close to the fence or stay under shrubs when the annoying person with a camera stepped carefully out of the house.  But I was not able to get good pictures of them because they never stood still!

For several days, the training went on, with one parent herding and fussing over the chicks, showing them how to find food and avoid predators, and the other parent standing guard atop the fence. Then they were gone.

I thought our quail excitement was over, and I had cleaned out the flower pot and planted new flowers.  One day, though, I saw a quail family in our yard, with significantly larger chicks.  Were they our quail family?  I don't know.  But all in all, it was fun and educational to watch Nature at work.

And this time, no recipe.

Friday, April 29, 2011

Chard Gets its Mojo Back

Formerly flat bunches of chard, after reconstituting submerged in water for two hours.
Our big hanks of chard from the CSA boxes tend to stick out of normal-size bags, and they wilt down to a pretty thin and floppy state when kept in the fridge too long.  I had accumulated quite a bit of chard, and wondered if it would be possible to restore the chard to its plump, crispy state.  Much to my surprise, I found that it is!

Because I didn't really expect the outcome to be this amazing, I didn't take a "before" picture. But my chard was flat, folks.  Droopy doesn't begin to describe it.  I trimmed the stem ends, and put it all in my big old yellow Tupperware bowl (you know, the gigantic one).  I filled the bowl to the brim with water.  Two hours later, I noticed that the chard was curling up crisply out of the bowl.  I prepared to spin it dry, but realized, as I lifted the leaves out, that it was already dry.  In the bottom of the bowl, only about 1/4 cup of water remained.  The chard had absorbed all the rest.  It looked as if it had just been picked.

So don't give up on your greens.  I suspect the key thing was to trim the stem ends; the water was probably absorbed into the chard through the stems.

Update:  It works for spinach, too.  Be sure to freshly tear or cut stem ends and make sure the stem ends are submerged.  I do think the leaves take up the water from them.  And I was delighted to discover a new way to use chard from commenter Janet.  Thank you!

Tuesday, April 26, 2011

Creamy Lemon, Garlic and Tarragon Chicken

 
Mr. Eating the Scenery once posited  that if tuna could be called Chicken of the Sea, it only stood to reason that chicken could be called Tuna of the Land.  Of course, this is the same man who wondered, upon observing this sign outside Yakima, a nearby city, if there was a corresponding sign outside Palm Springs billing it as the Yakima of California.  You can see why I like to keep Mr. ETS well nourished.

My intentions for these two free-range tuna ... er, chickens, started along the thyme and rosemary line.  But sunshine, bobbing robins, miscellaneous birdsong, bright green tarragon springing up outside ... diverse factors converged to make it obvious that something quite different was called for on this bright (albeit chilly) Spring day.  Herewith, the result.
___________________________________________
CREAMY LEMON, GARLIC AND TARRAGON CHICKEN
  
Long ago my mom taught me to cut up a chicken.  Later, my youthful, preppy self learned that you can buy chickens already cut up!  Now that I have reverted to local, free-range chickens, which come to me whole, I find that chicken-cutting-up skills, apparently, never leave you. 

2 lovely, free-range, local chickens  (mine were each about 3 pounds)
Coconut oil or your fat of choice
1 cup chopped tarragon
1 organic lemon, thinly sliced, seeds removed
8 cloves garlic, crushed or roughly chopped
1 cup white wine
Salt and freshly ground pepper

Pan juices from roasted chicken
1/2 cup Pure Eire organic Jersey cream
Fresh tarragon

Cut up chickens into leg/thigh pieces and breast pieces.   I left the breasts whole because I don't have a cleaver.  Put backs, necks, wings (if they're scrawny) into a plastic bag and freeze to make stock later.

Season chicken pieces with salt and pepper.

Heat oven to 450 degrees.

In large Dutch oven, heat coconut oil.  Brown leg/thigh pieces on both sides and remove to plate.  Brown breasts on skin sides, then turn upright in pan.  Pour in white wine.  Scatter half the garlic and tarragon over the breasts, and top with half the lemon slices.  Place leg/thigh pieces on and around the breast pieces, and top with remaining garlic, tarragon, and lemon slices.
Cover, and bake for 50 minutes.  Check internal temperature of breasts; when it is 165 degrees, chicken is done.  Lift chicken pieces from the Dutch oven and place them in a shallow casserole.  If you've left the breasts whole, remove the meat from them for easy serving.

Pour chicken juices through a strainer into a suitably sized saucepan.  Heat to a simmer, reduce if desired, stir in cream, heat through and pour over chicken pieces.  Top with fresh tarragon sprigs or chopped tarragon.

Serve with optimally prepared, fresh, local vegetables of your choice.

Makes 8 to 10 hearty servings.  And don't forget to make stock with the backs, wings and bones!

Sunday, April 24, 2011

Box Eleven

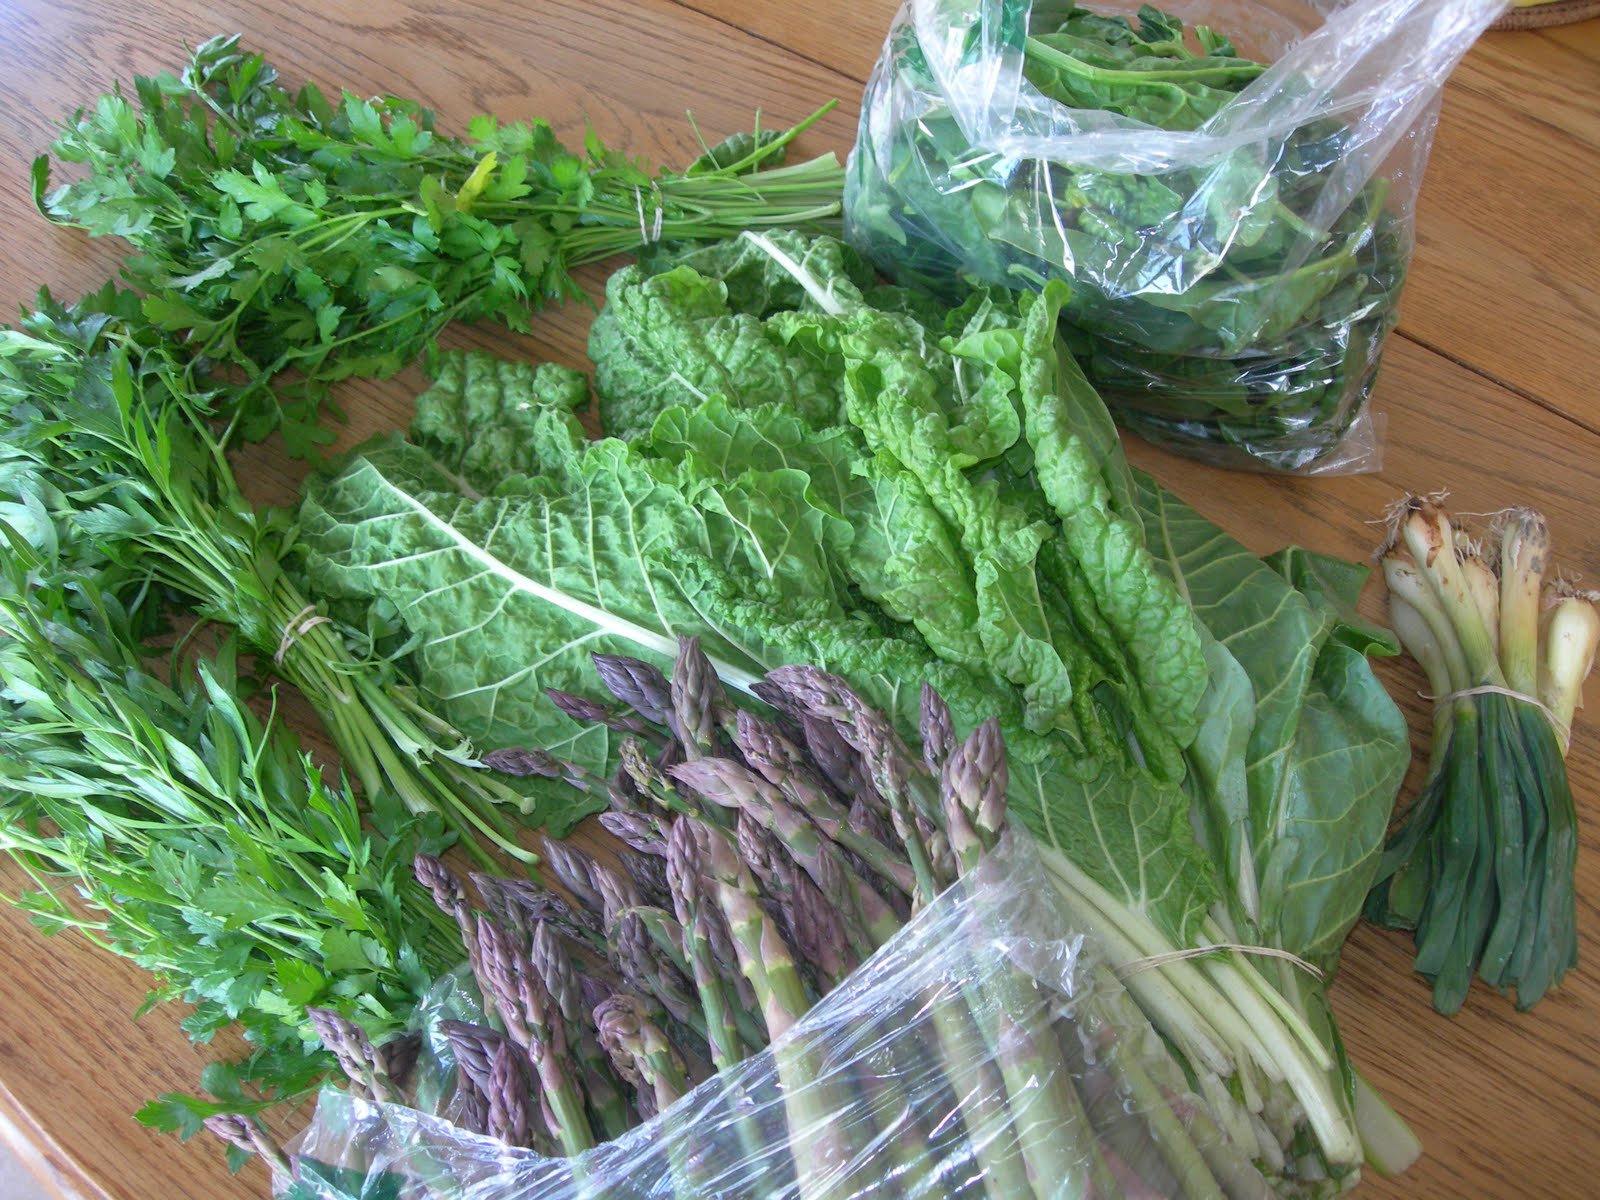
The last three boxes are all coming in a row ... this is the time of year when growing things really take off, and apparently it's mostly GREEN!  Chard, parsley, Walla Walla sweets, spinach, and delectable asparagus.  Like last year, I'll be sorry to see the boxes end, but am enormously grateful for our local farms and the fact that the farmers' markets are just around the corner.

Wednesday, April 20, 2011

Cheese Louise

The other day I stopped in at Cheese Louise, a cool little cheese and gift shop on The Parkway in Richland.  I love going in there, because the proprietors (who would rather be called "cheese mongrels" than cheesemongers) truly are dogged in their pursuit of cheese excellence.

Yes, their cheeses come from all over the world, but the shop is local!  And some of best cheeses in existence do, in fact, come from other parts of the world.  Cheese Louise does carry some Northwest-made products, as does Ariel Gourmet right next door.  And let's face it, if I knew of any locally-made cheeses, I'd be all over them.  I depend on my readers to let me know about local foods, because I can't discover them all myself! 

Anyhoo, that day at Cheese Louise, I slowly came to realize, through discussing the offerings with one of the delightful cheese consultants, that I was in the mood for feta.  "But not just any feta!" I insisted.  I have been disappointed in feta before ... expecting a sharp, briny tang and getting instead a chalky nothingness.  But at Cheese Louise, you can taste before you buy.  One taste of the all-sheep's-milk Pastures of Eden feta cheese, and my eyes lit up. Peoples' eyes lighting up is probably a pretty common occurrence at Cheese Louise.

That cheese was destined to be crumbled over a simple Greek salad of red pepper, cucumber, tomato, and Kalamata olives, with a drizzle each of lemon juice and olive oil, and a finishing sprinkle of oregano.  More will be stirred into sauteed spinach with mushrooms, and it's the kind of cheese you could just serve a hunk of, along with walnuts, crudites or fruit, and enjoy immensely.

If you haven't done so yet, do pop into Cheese Louise for a delightful cheese browse!

Monday, April 18, 2011

Asparagus and Prosciutto Bundles

Something there is about asparagus that makes one want to create elegant dishes with it.  It's a stalk, for one thing.  Cooks don't get to play with stalks all that often.  So, when I read the very short list of ingredients on a package of Parma proscuitto (pork, salt) at Costco, I felt the time had come for me to try prosciutto for the first time ever. 
_______________________________________________
ASPARAGUS AND PROSCIUTTO BUNDLES

I adapted this super simple version from several recipes online.  Some called for a sprinkling of Parmesan cheese, which I used, but prosciutto is salty, and the salty Parmesan seemed redundant.  So I left it out of my recipe.

1 pound luscious, local CSA asparagus
3 ounces prosciutto (if using two slices per bundle)
Butter

Lay two pieces of waxed paper out on countertop. Peel slices of prosciutto apart and lay them on one of the pieces of waxed paper.  It's okay if they overlap a bit--you just want to get them apart for ease of use.

Heat oven to 400 degrees.  Generously butter a 9 x 9-inch baking dish.  Reserve some butter for topping the bundles.

Bring about 1/2 inch lightly salted water to boil in a skillet.  Snap tough ends from asparagus, and wash the stalks.   Simmer asparagus in the water for just a few minutes, until stalks are just crisp tender.  With tongs, remove asparagus from skillet to the other piece of waxed paper.

Divide asparagus stalks into equal-sized bundles.  Wrap each bundle with a piece of prosciutto.  I used two pieces per bundle.  Some directions called for securing them with toothpicks, but I found the prosciutto adhered to itself quite well, and shrank a bit further in the oven, keeping a tight hold on the asparagus.

Place bundles in baking dish, and top each with a little butter.  Bake for 10 minutes or until things start to sizzle a bit.  Remove from oven, turn each bundle a little to bathe it in butter, and serve.  It's easiest to cut the bundles into bite-sized pieces with a sharp knife.

Makes 6 bundles, or about 3 servings.

Thursday, April 14, 2011

Winter CSA: Tenth Box

Asparagus (and thus, to me, true Spring) is here!  Our farmer specializes in asparagus, and it doesn't get more tender or fresh than this.  As well, we have mixed salad greens, spinach, Walla Walla sweet onions, chives, and cilantro.  Only two more boxes, and I'm set to appreciate the heck out of all this local greenery ... and then start frequenting the local farmer's markets! 

Nature's little creatures also like our fresh CSA asparagus ...

Thursday, April 7, 2011

Duck Eggs


I probably should have seen this coming, but of course I did not.  Being a tad impulsive when in the presence of interesting food opportunities, and because the duck experiment turned out so well, I couldn't resist continuing the duck theme, and so picked up a box of Russ and Laurie's duck eggs when I saw them in the cooler with the chicken eggs at the Northwest Seafood Market pickup site.

Googling, I find that duck eggs are larger and richer than chicken eggs, and the shells are harder to crack.  After using the duck eggs in a scrumptious omelette, and in another berry flaugnarde, I can attest that both facts are true.  I honestly think one duck egg is equal to two chicken eggs.  Easy.

As well, duck eggs are supposed to perform exceptionally well in baking, possibly due to their extra rich quality.  I plan to use them in a grain-free bread or pancake recipe to see if the higher rise and better texture claims are true.

The duck eggs are available for $4.75 a dozen in the cooler at Northwest Seafood Market in Richland, but if there aren't any there, contact Russ at his website.

Update:  Due to job changes and a relocation, Russ will be shutting down his farm after the winter egg subscriptions end later this month.  As long as the eggs are available, they'll be in the cooler at Northwest Seafood Market.  Contact Russ if you need the details to order and pick up meat chickens, which will be processed next weekend.  Wow, I'll really miss Russ and Laurie's wonderful products.  My deepest gratitude and best wishes to you in this next adventure in life!

Sunday, April 3, 2011

Ninth Box

Box Nine contained two bags of golden delicious apples (crisp and juicy!), a big 'ol fennel with tentacles reaching everywhere, green onions, salad greens, spinach, chard, sage, and chickpeas.  The salad greens were scrumptious in a salmon salad, and the green onions found their way into Tom Kha (a Thai soup).  The fennel looks to me like it should be in a gratin.  Hmm.  I sauteed the chard and spinach together, and they were delicious.  I recently read that if you eat leafy greens regularly, you will get your needed Omega 3's as well as calcium.  Eating scenery has its perks!

And that's Bananagrams in the background.  If you haven't discovered the joys of Bananagrams, and you like word games, well--you're missing out.  Go get it!  It's way more fun than Scrabble, because it's fast moving, you don't have to wait for other people to take their turns, and you're completely in charge of your own word arrangement.

Saturday, April 2, 2011

Kale with Garlic, Sage and Thyme Butter

A serendipitous dish, put together with ingredients I had on hand.  The thyme and sage in my herb garden looked particularly fetching, even after our winter freezes, so I decided to stride confidently in the direction of the kale dish I was beginning to envision.

Sage and butter have long been happy partners, and I discovered that kale loves sage, too.  This is a company-worthy kale dish, with a little heat from the red pepper, a satiny smoothness from the butter, and a rich, savory taste from the herbs and garlic. 
_________________________________________
KALE WITH GARLIC, SAGE AND THYME BUTTER

1 bunch lacinato kale
1 large onion, peeled, halved and sliced
5 tablespoons butter or ghee

6 cloves garlic
Leaves from 1 handful of fresh thyme sprigs
A handful of fresh sage leaves
1/8 to 1/4 teaspoon crushed red pepper

1 cup chicken broth or white wine
Salt if needed

6 small fresh tomatoes, quartered

Wash kale, remove thick stems (I do this by ripping the kale away from the stem) and slice the kale into thin strips.
Peel garlic cloves and place them in a small food processor with the thyme and sage leaves.  Process to a fine chopped state.  Alternatively, chop the garlic and herbs finely with a knife.

In large-ish skillet, heat butter or ghee over medium heat.  Add onions and saute for a few minutes.  Add garlic and herb mixture and saute a few more minutes, stirring occasionally.  Finally, stir in the kale and chicken broth, bring to a simmer, and cook for about 10 minutes, stirring occasionally.

Taste sauce for salt; I added 1/4 teaspoon.  Just before serving, stir in the tomatoes and heat just until the tomatoes are warmed through and savory looking.  Serve hot.

Makes 4 hearty servings

Monday, March 28, 2011

Bison Chili


Whoa!  This is what happens when you've been craving chili and you see "Buffalo" on a package of ground meat at the grocery store:  You throw three packages of the stuff in your cart, and go home to create the best darn chili on the range.  Yessiree, this is hearty, satisfying fare.  I didn't have a recipe, but I wrote down everything I did.  'Cause this chili is definitely going to be made again. 

As the creative process unfolded, the red pepper and kohlrabi in the photo were relegated to crudite status.  I made an innovative cornbread stand-in, using macadamia oil instead of grapeseed oil, that turned out to be amazingly good.  Yee haw!

Because absolutely authentic chilies don't contain beans or tomato, I'm thinking about trying this sans-tomato next time.

This recipe comes with a book recommendation:  The Buffalo Commons by Richard S. Wheeler.  
____________________________________________
BISON CHILI 

The ancho chili powder will determine the overall taste and heat level of your chili.  I make my own with those leathery ancho peppers sold in the Mexican food aisle at the supermarket, mixing in a dried hot chili pepper or two. Make a lot!  Good ancho chili powder is hard to find, and makes a great gift.  It's especially important for red sauces for enchiladas, and chilies like this one.

3 pounds ground bison
2 tablespoons oil (I used avocado oil)

4 carrots, in 1/2-inch dice
1 turnip, peeled and cut in 1/2-inch dice
1 fennel bulb, trimmed and cut into 1/2-inch dice
2 onions (I used a red onion and a white onion), peeled and cut into 1/2-inch dice
1 small zucchini, cut into 1/2-inch dice
1 head garlic, cloves separated, peeled and minced

2 tablespoons ancho chili powder (see note above) or regular 'ol chili powder
1 tablespoon regular 'ol chili powder
1 tablespoon smoked paprika
1 tablespoon cumin seed, toasted in a dry skillet and slightly crushed with mortar and pestle
1 teaspoon salt

1 jar (26 oz.) spaghetti sauce
1 jar (7 oz.) tomato paste
3-4 cups water

3 fresh bay leaves or 1 dried bay leaf

In large soup pot, heat oil.  Add bison, break up with your spatula, and begin to saute.  While that's going on, prep your veggies in the order given and add them to the pot, stirring well each time.  By the time you get to the garlic, things should be sizzling along nicely.

Scatter the chili powders, paprika, cumin seed and salt over the meat/vegetable mixture, and stir well, cooking for a few minutes 'til the spicy aroma begins to waft around your kitchen.  Stir in the bay leaves.

Add the spaghetti sauce, the tomato paste, and 3 cups water.  Bring to a simmer and cook for 30 to 40 minutes. If you like a saucier chili, add another cup of water.

Makes 8 to 10 hearty servings.